Change validator options#
Note
All transfers and transactions cost a fee, including staking and unstaking transactions. The fee is based on the set NRG for that transaction and the current exchange rate. The cost of transaction fees is stable in Euros, and therefore the price in CCD varies depending on the CCD to EUR exchange rate. The fee will always be deducted from the Balance of the account, so it is important to have some available CCDs to cover fees. A locked-for-staking balance cannot be used to pay for these transactions. You can see the fee in the transaction log.
Warning
Transactions on the blockchain can’t be reversed or deleted. They will always exist on the blockchain. Therefore, carefully review transactions before submitting.
The following information describes how to access validator settings to update your stake or restaking preference, to open and manage a staking pool, update validator keys, or stop validation for the CryptoX Concordium Wallet, Concordium Wallet for Web, and Desktop Wallet.
Update validator stake and restaking preference#
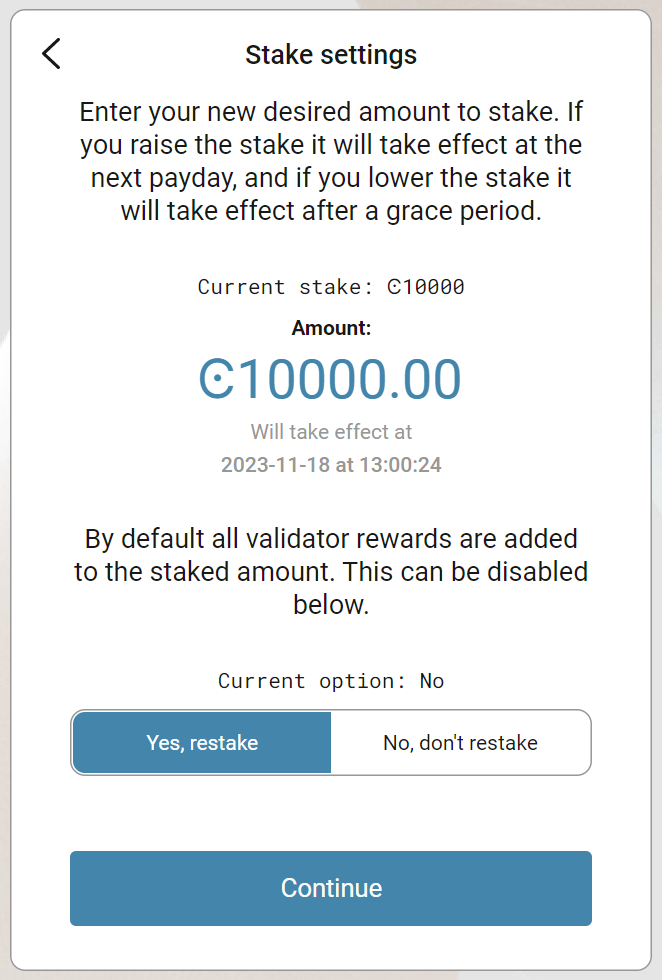
You can change the staked amount on a validator account. Changes will take effect at the next pay day. If the change is made in the last epoch before pay day, then the change will not occur until the following pay day. However, if you decrease the stake, there is a cool-down period of three weeks. After the cool-down period, the amount you’ve decreased the stake with is returned to your disposable balance at the next pay day.
When you change the stake it can influence your chance of being selected to produce a block and receive block rewards. If you decrease the stake, you decrease your chances of producing blocks. Likewise, if you increase the stake, you increase your chances of producing a block.
CryptoX Concordium Wallet
Tap the Earn button on the main screen.
On the validation screen, tap Update and then, Update validator stake.
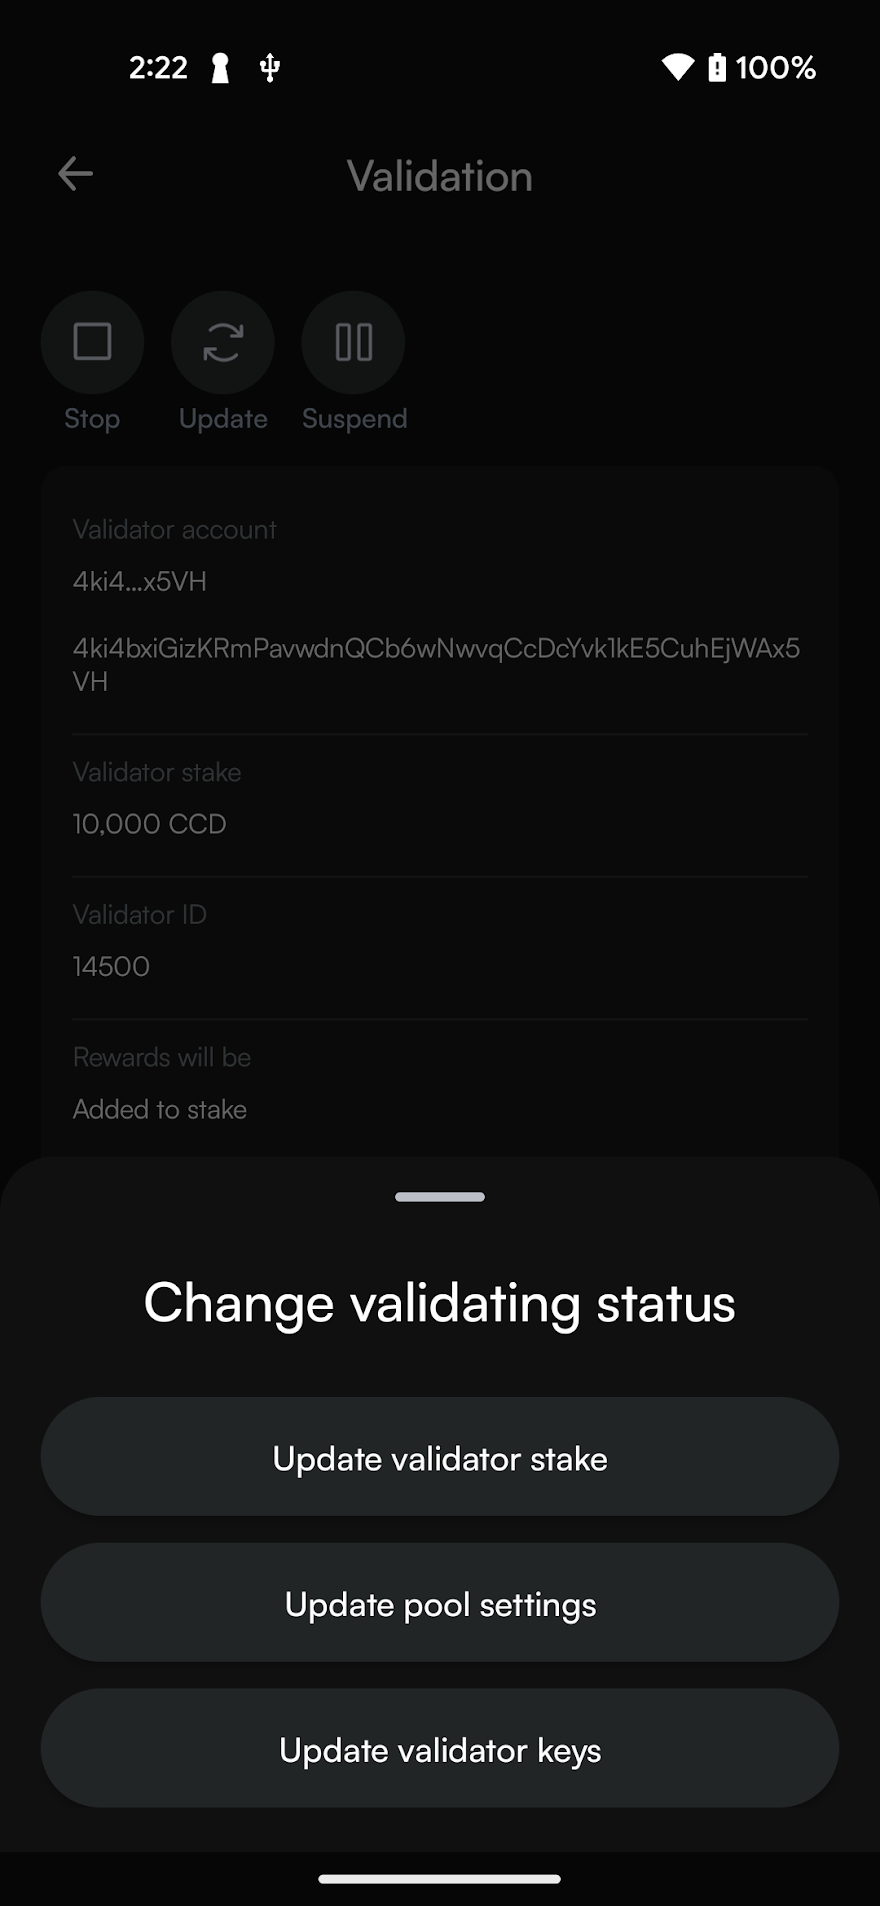
Read through the information screen explaining the the options for updating validator settings. Tap Update validation at the bottom of the screen to proceed.
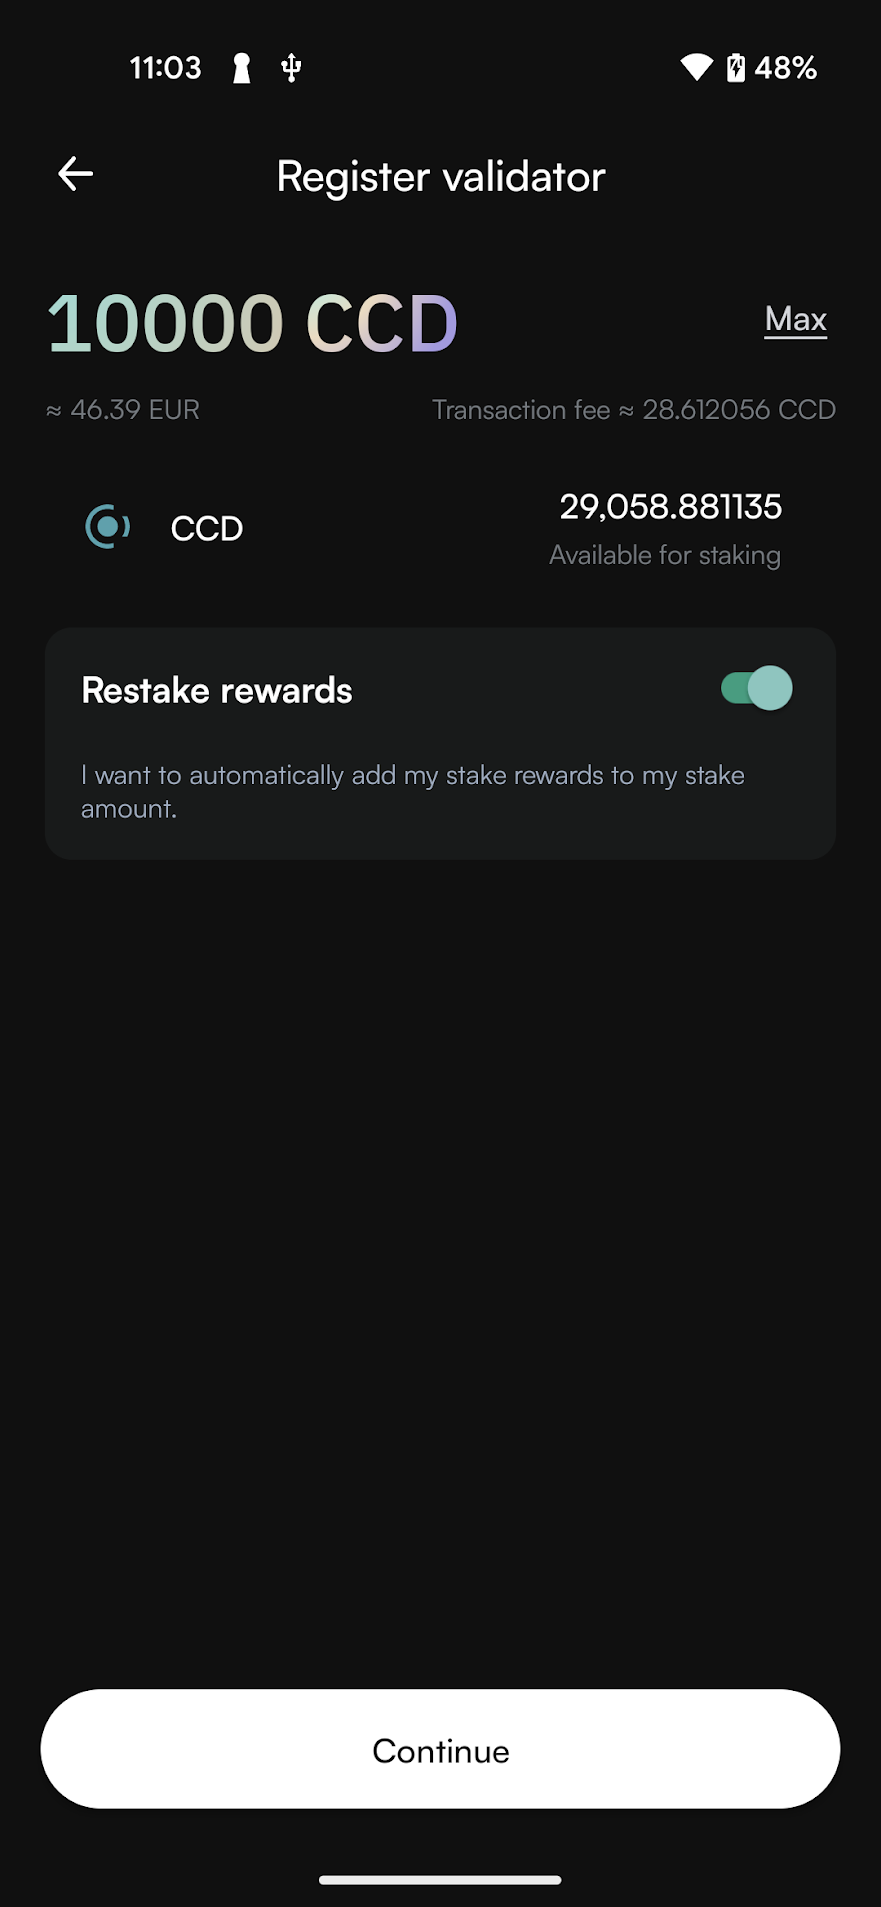
Now you see your balance and the current validator stake amount. Enter the total amount you want to stake. You can also choose to adjust your restake settings. Toggle the Restake rewards switch if you want to change your restaking preferences. When you’re satisfied with your staking configuration, tap Continue to proceed with your updates.
On the overview screen, review the information. Swipe right on the Update stake slider to submit the validation update.
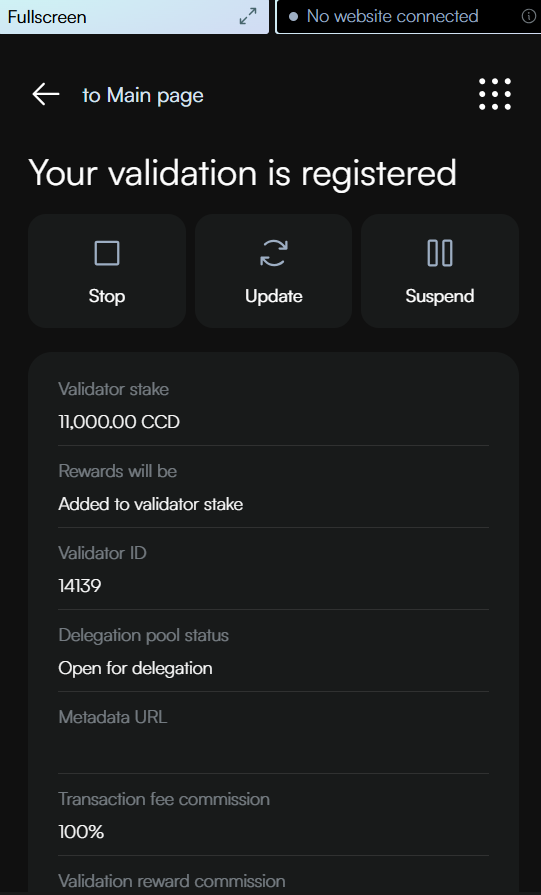
The wallet shows a confirmation screen with a green checkmark indicating that your validation update has been successfully submitted to the chain. You can click Transaction details to view more information about the transaction, or Close to return to the main screen.
Concordium Wallet for Web
In the dropdown list, select the account for which you want to update the validation options and click Earn.
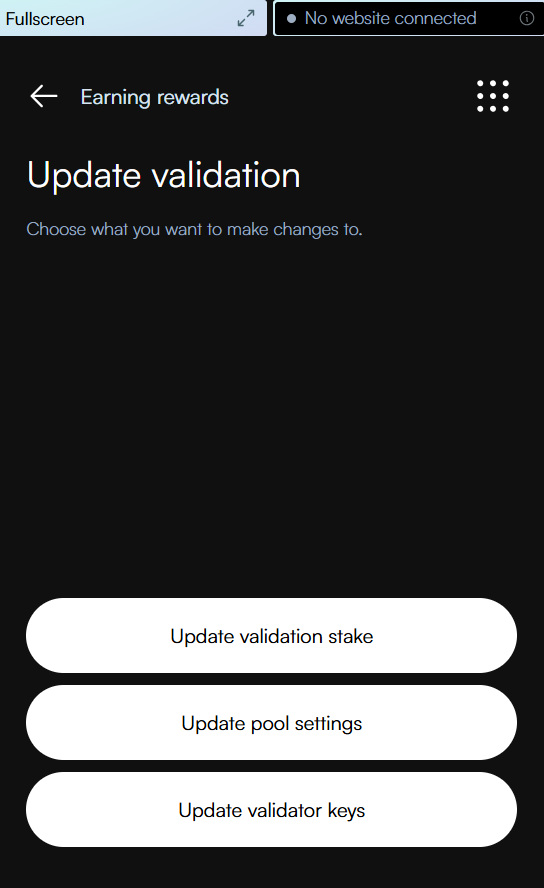
On the next screen, click Update.
On the next screen, click Update validation stake.
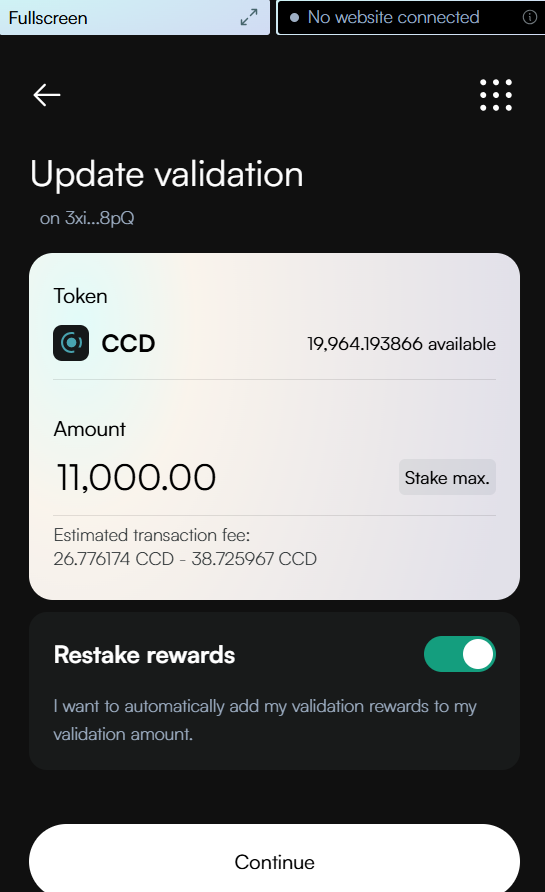
You can now change the staked amount by updating the Amount field or change your restaking preferences by toggling the ‘Restake rewards’ option. When the Restake rewards toggle is enabled, your validation rewards will automatically be added to your validation amount, increasing your stake over time. When the Restake rewards toggle is disabled, your rewards will instead be deposited to your disposable balance at each pay day. When you’re satisfied with your staking configuration, tap the Continue to proceed with your updates.
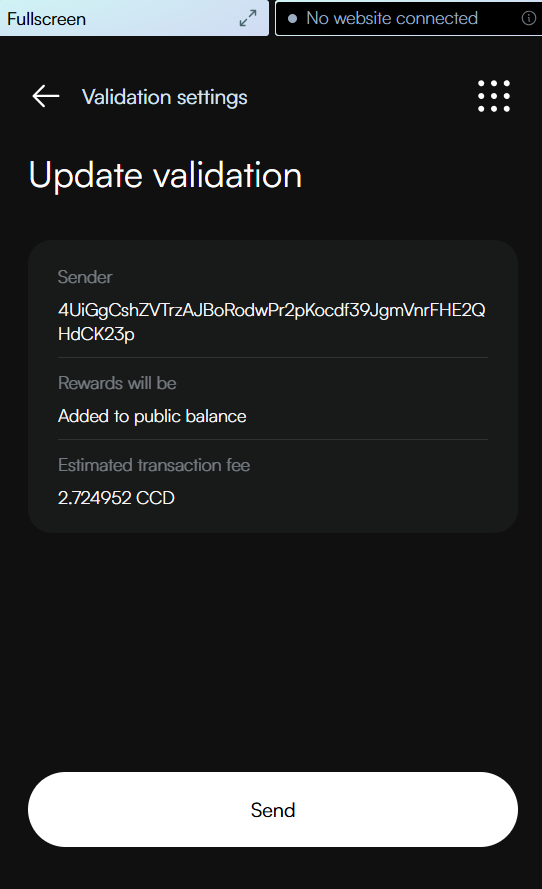
Review the transaction details. Click Send to submit the transaction. If you need to make any changes, you can go back to the previous step.
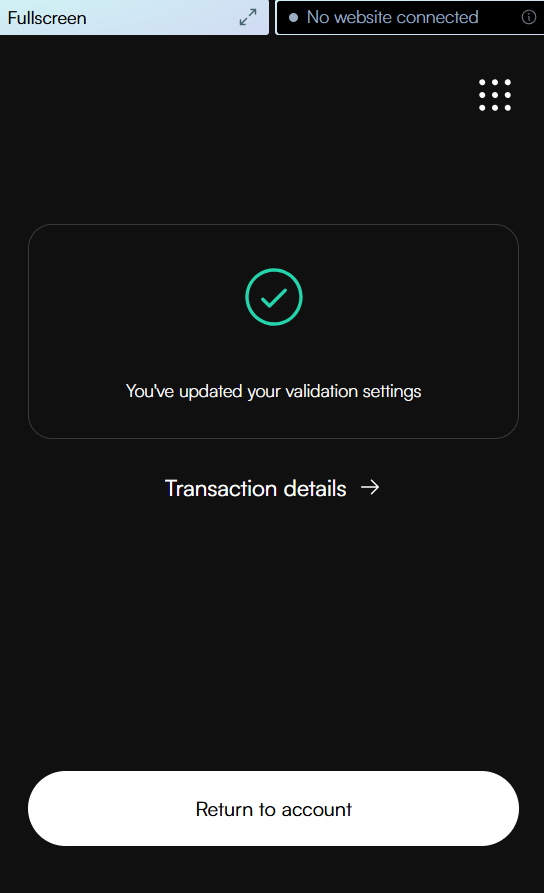
The wallet displays a confirmation screen with a green checkmark, indicating your validation settings have been successfully updated. You can click Transaction details to view more information about the transaction, or Return to account to go back to your account overview.
Desktop Wallet
Single signature account
Go to Accounts and select the account whose validator stake you want to change. Click More options.
Click Validation.
Click Update validator stake.
Enter the new amount that you want to stake if you want to change the amount. Change the restaking preference if you want to change that. Click Continue.
A message says Waiting for device. Please connect your Ledger. Connect the LEDGER device to the computer and enter your PIN on the LEDGER device.
Press the right button to navigate to the Concordium app, and then press both buttons to open the app. The LEDGER device says Concordium is ready. Wait for the message Ledger device is ready in the Desktop Wallet and select Submit.
On the LEDGER device, a message says Review transaction. Verify that the sender account is correct and navigate to the right. The LEDGER device says Update stake to and then the amount you’re going to update the stake to. Navigate to the right.
The LEDGER device says Sign transaction. Press both buttons to sign the transaction. The LEDGER device says Concordium is ready.
In the Desktop Wallet, you can see that the transaction has been submitted to the chain. Select Finish.
Multi signature account
Go to Multi Signature Transactions, select Make new proposal, and then select Update validator stake.
Select the account whose validator stake you want to change.
Enter the new amount that you want to stake if you want to change that. Change the restaking preference if you want to change that. Click Continue.
Set an expiry date and time for your proposal. Consider this when you set the expiry time so that the co-signers can return their signatures in time. Select Continue. You can now generate the transaction.
Generate the transaction
There are two ways that you can generate the transaction:
Generate the transaction without signing. This option enables you to export the transaction proposal without signing it. You don’t need a LEDGER device but you do need an internet connection.
Generate and sign the transaction This option requires a LEDGER device and an internet connection.
In combination, these two options enable you to distribute the responsibility of creating and signing transfers among more people. You can, for example, have one person create the proposal and another one sign the proposal. It also makes it possible for you to sign the transaction on the LEDGER device in a different location than where the proposal was created.
Generate the transaction without signing
Verify that the Transaction details are as you intended, and then select I am sure that the proposed changes are correct.
Select Generate without signing. You can now export the proposal.
Generate and sign the transaction on the LEDGER
If you haven’t connected the LEDGER device, there’s a message in the Desktop Wallet saying Waiting for connection until you connect the LEDGER device. Enter your PIN code on the LEDGER device. Press the buttons above the up and down arrows to choose a digit, and then press both buttons to select the digit.
Wait for the message in the Desktop Wallet saying Open the Concordium application on your Ledger device. On the LEDGER device, press the right button to navigate to the Concordium app, and then press both buttons to open the app. The LEDGER device says Concordium is ready. Wait for the message in the Desktop Wallet saying LEDGER device is ready.
In the Desktop Wallet, Verify that the Transaction details are as you intended, select I am sure that the proposed changes are correct, and then select Generate and Sign.
On the LEDGER device, there’s a message saying Review transaction. Verify that the sender account is correct, and navigate to the right. The LEDGER device says Update stake to and then the amount you’re going to update the stake to. Navigate to the right.
The LEDGER device says Sign transaction. Press both buttons to sign the transaction. The LEDGER device says Concordium is ready.
Note
If you want to decline the transaction, press the right button on the LEDGER devuce. The hardware wallet now says Decline to sign transaction. Press both buttons to decline. In the Desktop Wallet, there’s a message saying The action was declined on the Ledger device. Please try again.
In the Desktop Wallet, you can now see Transaction details, Signatures, and Security & Submission Details, which include the status of the transaction, the identicon, and the transaction hash. If you have all the required signatures, you can submit the transaction to the chain, otherwise, you’ll have to export the proposal and receive signatures from the co-signers.
Export proposal
If more than one signature is needed to sign off on the proposal, you have to share a file of the type JSON, which contains the transaction information, with the co-signers.
In the Desktop Wallet, select Export transaction proposal.
Navigate to the location on your computer where you want to save the file. If you’re on Windows make sure that All Files is selected in Save as type. Give the file a name and the extension .json, and then click Save.
You have to export the transaction proposal and send it to the co-signer through a secure channel. Optionally, you can also send the Identicon to the co-signers through a different secure channel.
Receive signatures from co-signers
When the co-signers have signed the transaction, they return the signed transaction proposal to you, and you have to import the files into the Desktop Wallet before you can submit the transaction to the chain.
If you’re still on the same page, go to step 3. If you left the page with the account transaction, go to Multi-signature Transactions, and then select Your proposed transactions.
Select the transaction that you want to submit to the chain. You can see an overview of the transaction details and an overview of the signatures. You can also see that the status of the transaction is Unsubmitted, and you can see the identicon and the transaction hash.
Select Browse to file and then navigate to the location on your computer where you saved the signed transaction files. Select the relevant files, and then select OK. The files are uploaded to the Desktop Wallet and added to the list of signatures. Alternatively, you can drag and drop the signature files from their location on the computer and onto the Desktop Wallet.
Submit the transaction to the blockchain
When you have received and added all the required signatures, you can submit the transaction to the blockchain.
Review the transaction details carefully to ensure that all information is correct.
Select I understand this is the final submission and that it cannot be reverted.
If you don’t want to submit the transaction to the chain, you can select Cancel. The proposal is no longer active. However, it is still visible in the list of proposals.
Select Submit transaction to chain. The transaction is submitted to the chain and finalized on the ledger.
Select Finish to leave the page.
Update pool settings#
CryptoX Concordium Wallet
Tap the Earn button on the main screen.
On the validation screen, tap Update and then, Update pool settings.
Read through the information screen explaining the the options for updating validator settings. Tap Update validation at the bottom of the screen to proceed.
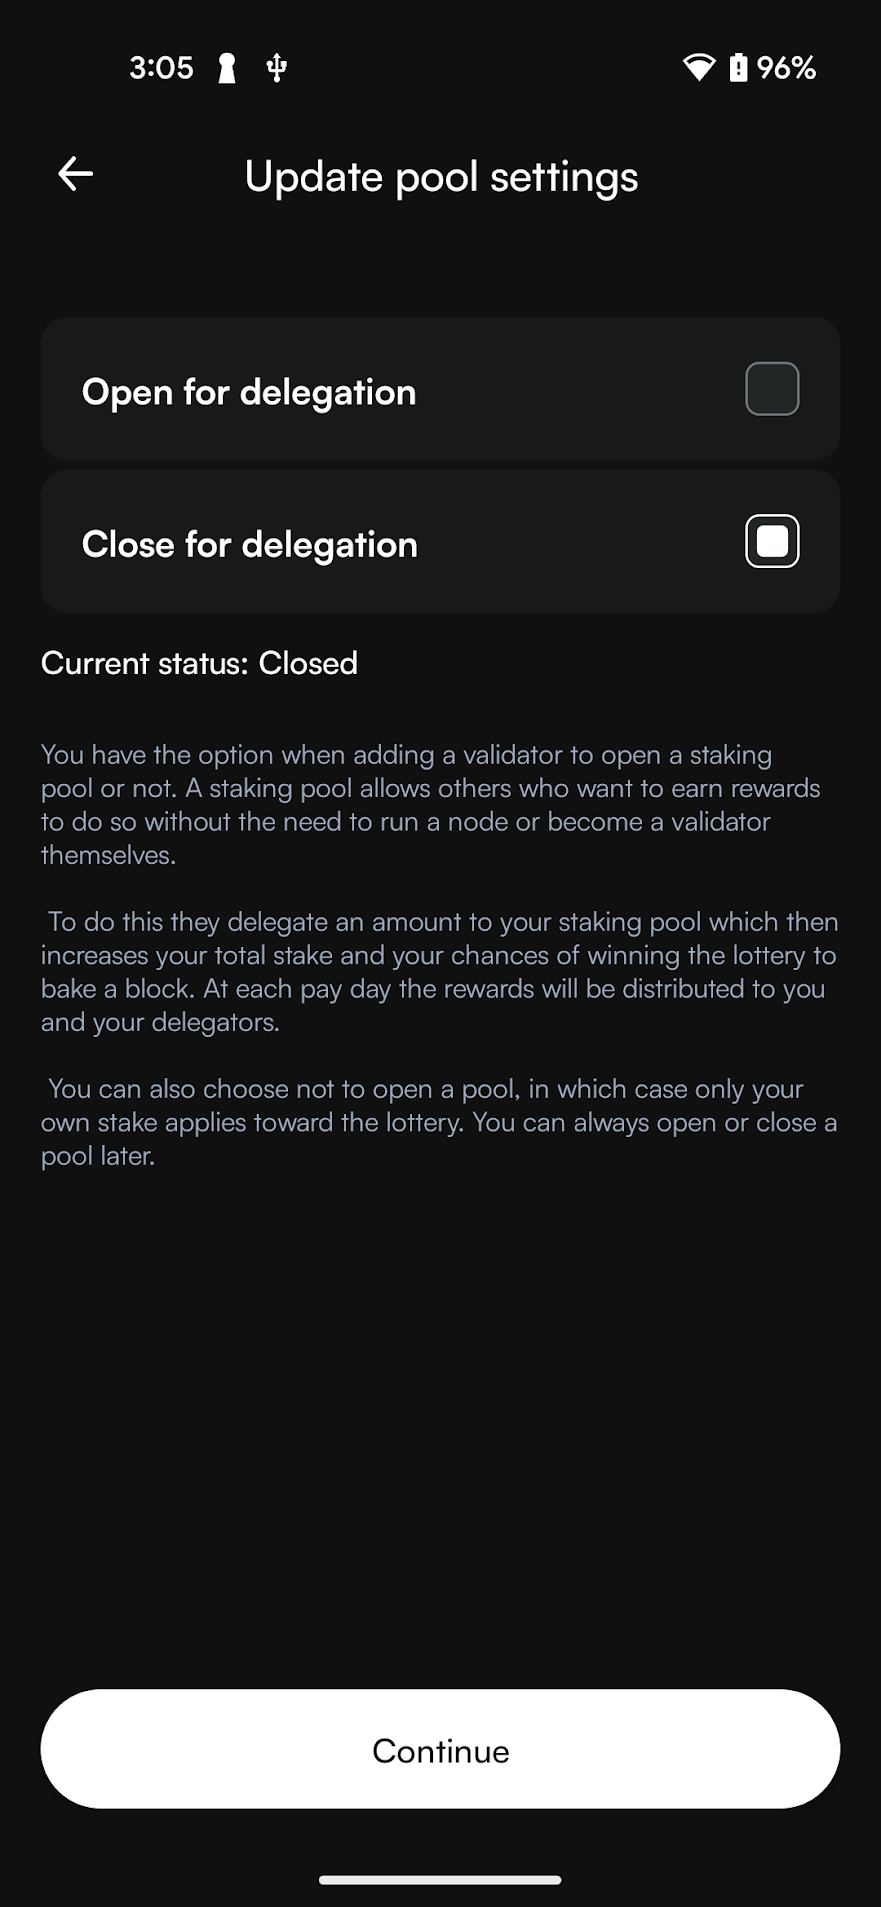
You now see the pool setting options and your current status:
Open for delegation: Select this option for opening a pool for a previously closed validator
Close for delegation: Select this option for closing a pool permanently.
Select the preferred setting and tap Continue.
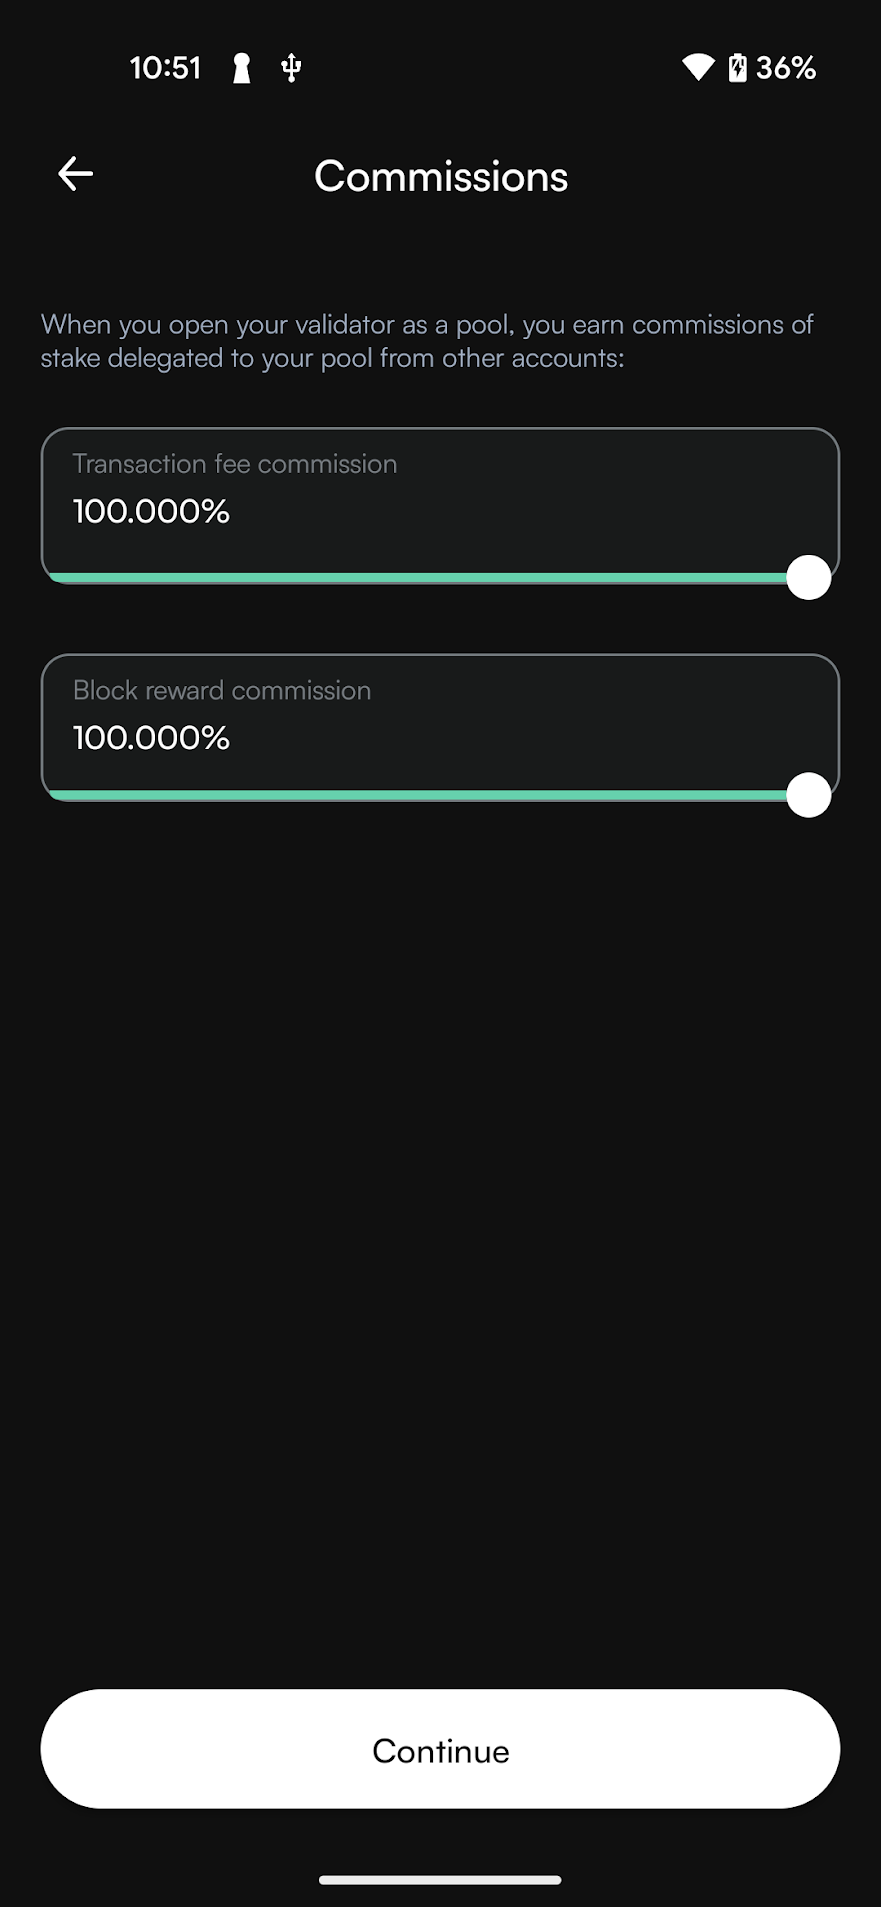
If you have an open pool, you can set or update the validator commission rates here. This is the percentage of rewards you keep when others delegate their stake to your validator pool.
Use the sliders to adjust both the Transaction fee commission and Block reward commission - by default, both are set to 100% (meaning you keep all rewards). After setting your desired commission rates, tap Continue to proceed.
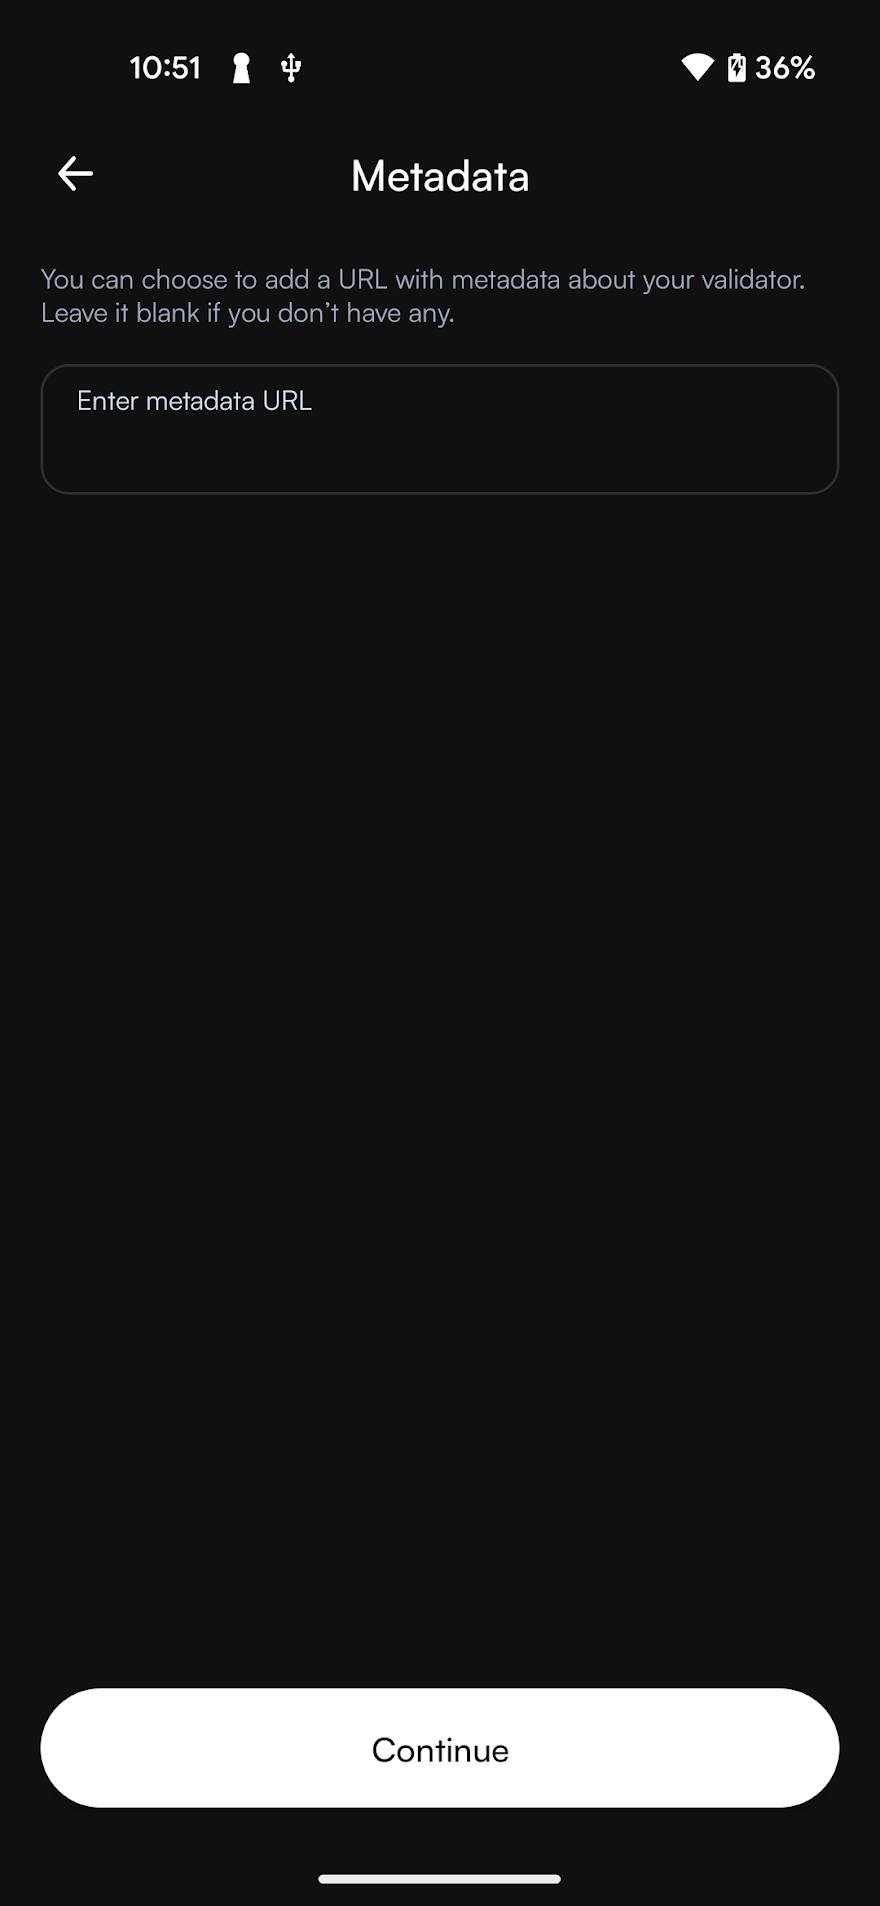
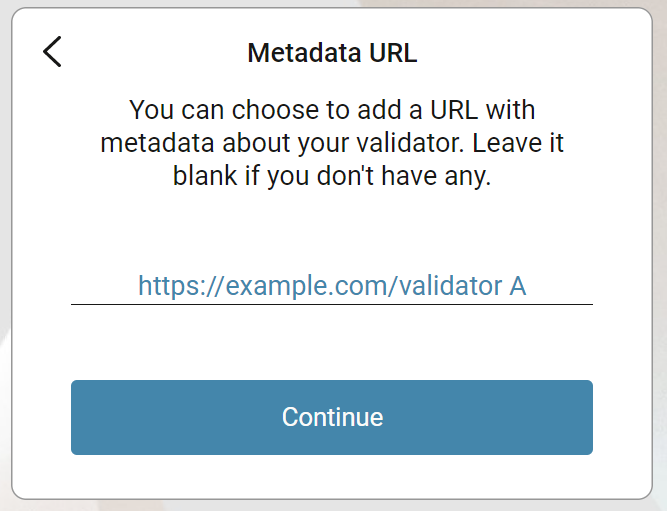
If you have an open pool, you can, optionally, enter a URL with information about your validator. This will give delegators additional information when researching staking pools. This information is not shared in the case of a closed pool. Tap Continue to proceed.
On the overview screen, review the information. Swipe right on the Update pool slider to submit the validation update.
The wallet shows a confirmation screen with a green checkmark indicating that your validation update has been successfully submitted to the chain. You can click Transaction details to view more information about the transaction, or Close to return to the main screen.
Concordium Wallet for Web
In the dropdown list, select the account for which you want to update the pool settings and click Earn.
On the next screen, click Update.
On the next screen, click Update pool settings.
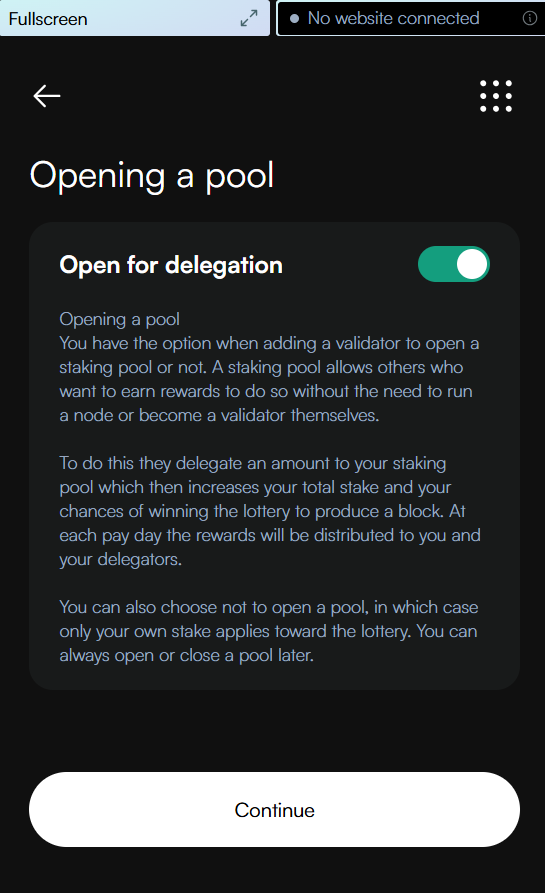
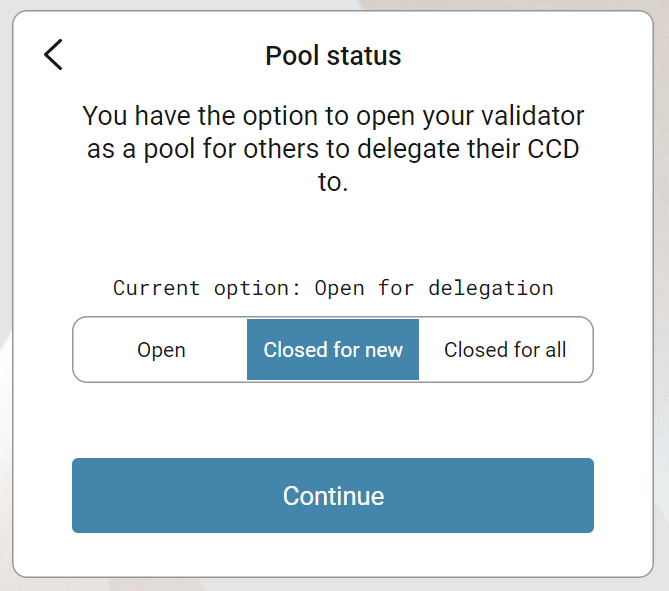
On this screen, you can toggle whether your validator is open for delegation. When enabled, other users can delegate their tokens to your validator, increasing your total stake and improving your chances of producing blocks. Rewards earned will be distributed between you and your delegators at each pay day. If you prefer to validate with only your own stake, you can disable this option. Once you’ve made your selection, tap Continue to proceed.
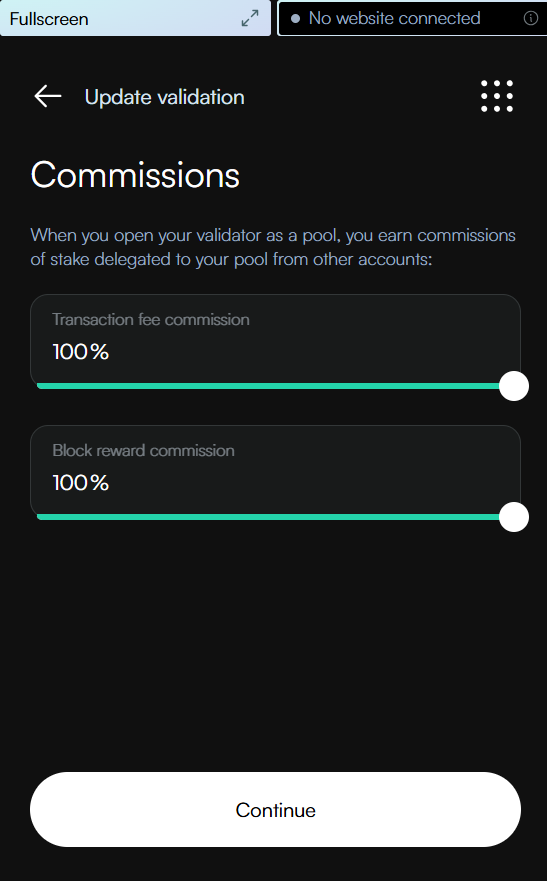
On the Commissions screen, you can set the percentage of rewards you keep when others delegate their stake to your validator pool. Use the sliders to adjust both the Transaction fee commission and Block reward commission - by default, both are set to 100% (meaning you keep all rewards). After setting your desired commission rates, click Continue to proceed.
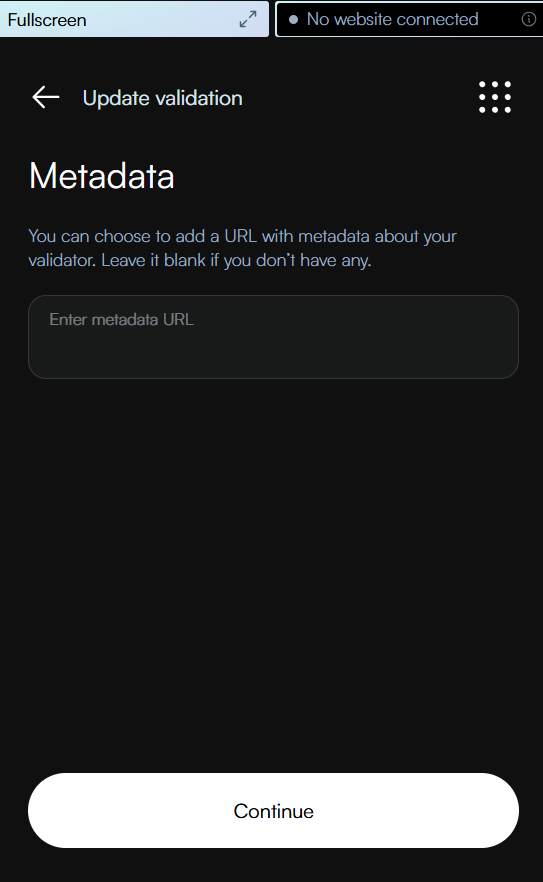
Update the staking pool metadata URL, if desired. Click Continue.
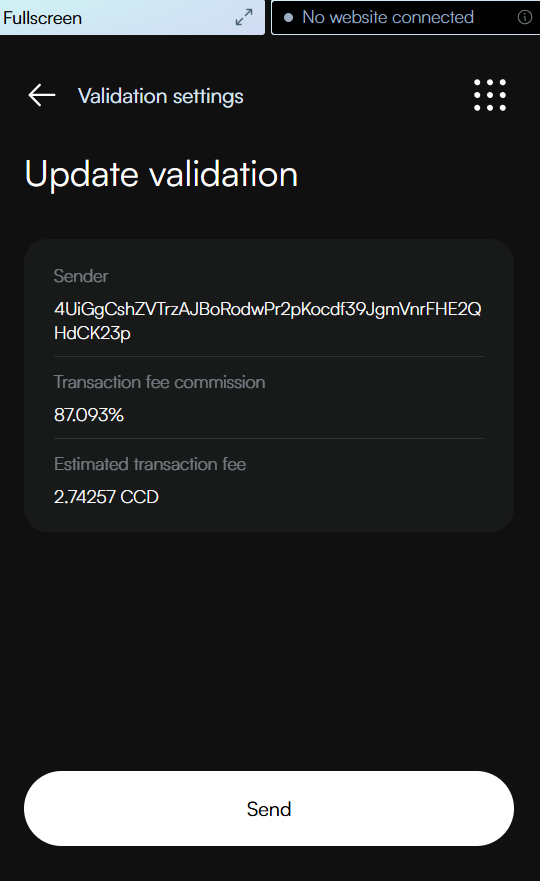
Review the transaction details. When you’re satisfied with the configuration, scroll down and click Send to finalize the transaction.
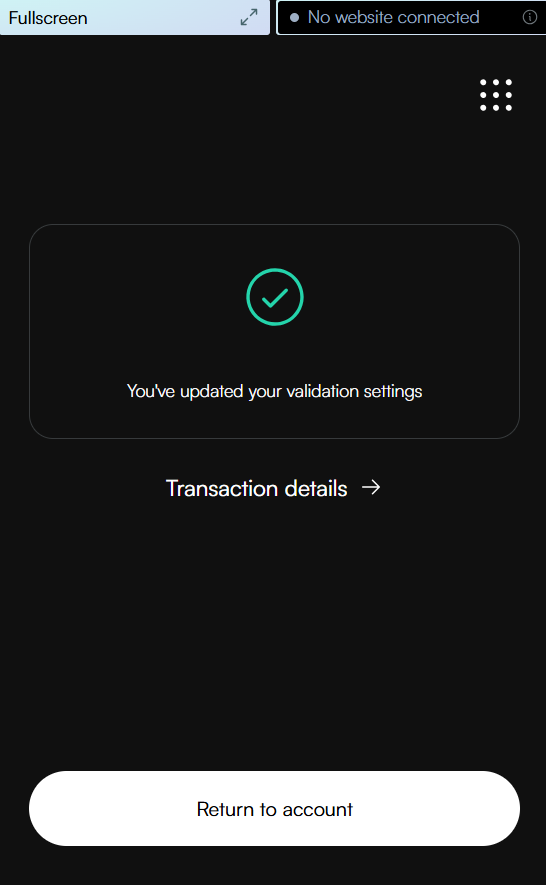
The wallet shows a confirmation screen with a green checkmark indicating that your validation settings have been successfully updated. You can click Transaction details to view more information about the transaction, or Return to account to return to your account overview.
Desktop Wallet
Single signature account
Go to Accounts and select the account on which you have a staking pool that you want to update and click More options.
Select Validation.
Click Update staking pool.
Choose the status for your staking pool if you want to change its status and click Continue. If you do not want to change the status, click Continue. Options are:
Open: open your staking pool to delegators.
Closed for new: close the staking pool to new delegators. Existing delegators remain in the pool.
Closed for all: close the pool for all delegators.
Review the commission rates and adjust with the sliders or type in the rate. Click Continue.

Enter your validator metadata URL if you want to provide this information to potential delegators. This is optional. Click Continue.
A message says Waiting for device. Please connect your Ledger. Connect the LEDGER device to the computer and enter your PIN on the LEDGER device.
Press the right button to navigate to the Concordium app, and then press both buttons to open the app. The LEDGER device says Concordium is ready. Wait for the message Ledger device is ready in the Desktop Wallet and select Submit.
On the LEDGER device, a message says Review transaction. Verify that the sender account is correct and navigate to the right. Verify that the LEDGER device shows the correct amount to delegate and navigate to the right. Verify that the restake preference is correct and navigate to the right. Verify that the delegation target is correct and navigate to the right.
The LEDGER device says Sign transaction. Press both buttons to sign the transaction. The LEDGER device says Concordium is ready.
In the Desktop Wallet, you can see that the transaction has been submitted to the chain. Select Finish.
Multi signature account
Go to Multi Signature Transactions, select Make new proposal, and then select Update staking pool.
Choose the status for your staking pool if you want to change its status and click Continue. If you do not want to change the status, click Continue. Options are:
Open: open your staking pool to delegators.
Closed for new: close the staking pool to new delegators. Existing delegators remain in the pool.
Closed for all: close the pool for all delegators.
Review the commission rates and adjust with the sliders or type in the rate. Click Continue.
Enter your validator metadata URL if you want to provide this information to potential delegators. This is optional. Click Continue.
Set an expiry date and time for your proposal. Consider when you set the expiry time so that the co-signers can return their signatures in time. Select Continue. You can now generate the transaction.
Generate the transaction
There are two ways that you can generate the transaction:
Generate the transaction without signing. This option enables you to export the transaction proposal without signing it. You don’t need a LEDGER device but you do need an internet connection.
Generate and sign the transaction This option requires a LEDGER device and an internet connection.
In combination, these two options enable you to distribute the responsibility of creating and signing transfers among more people. You can, for example, have one person create the proposal and another one sign the proposal. It also makes it possible for you to sign the transaction on the Ledger in a different location than where the proposal was created.
Generate the transaction without signing
Verify that the Transaction details are as you intended, and then select I am sure that the proposed changes are correct.
Select Generate without signing. You can now export the proposal.
Generate and sign the transaction on the LEDGER device
If you haven’t connected the LEDGER device, there’s a message in the Desktop Wallet saying Waiting for connection until you connect the LEDGER device. Enter your PIN code on the LEDGER device. Press the buttons above the up and down arrows to choose a digit, and then press both buttons to select the digit.
Wait for the message in the Desktop Wallet saying Open the Concordium application on your Ledger device. On the LEDGER device, press the right button to navigate to the Concordium app, and then press both buttons to open the app. The LEDGER device says Concordium is ready. Wait for the message in the Desktop Wallet saying LEDGER device is ready.
In the Desktop Wallet, Verify that the Transaction details are as you intended, select I am sure that the proposed changes are correct, and then select Generate and Sign.
On the LEDGER device, there’s a message saying Review transaction. Verify that the sender account is correct and navigate to the right. Verify that the LEDGER device shows the correct amount to delegate and navigate to the right. Verify that the restake preference is correct and navigate to the right. Verify that the delegation target is correct and navigate to the right.
The LEDGER device says Sign transaction. Press both buttons to sign the transaction. The LEDGER device says Concordium is ready.
Note
If you want to decline the transaction, press the right button on the LEDGER device. The LEDGER device now says Decline to sign transaction. Press both buttons to decline. In the Desktop Wallet, there’s a message saying The action was declined on the Ledger device. Please try again.
In the Desktop Wallet, you can now see Transaction details, Signatures, and Security & Submission Details, which include the status of the transaction, the identicon, and the transaction hash. If you have all the required signatures, you can submit the transaction to the chain, otherwise, you’ll have to export the proposal and receive signatures from the co-signers.
Export proposal
If more than one signature is needed to sign off on the proposal, you have to share a file of the type JSON, which contains the transaction information, with the co-signers.
In the Desktop Wallet, select Export transaction proposal.
Navigate to the location on your computer where you want to save the file. If you’re on Windows make sure that All Files is selected in Save as type. Give the file a name and the extension .json, and then click Save.
You have to export the transaction proposal and send it to the co-signer through a secure channel. Optionally, you can also send the Identicon to the co-signers through a different secure channel.
Receive signatures from co-signers
When the co-signers have signed the transaction, they return the signed transaction proposal to you, and you have to import the files into the Desktop Wallet before you can submit the transaction to the chain.
If you’re still on the same page, go to step 3. If you left the page with the account transaction, go to Multi-signature Transactions, and then select Your proposed transactions.
Select the transaction that you want to submit to the chain. You can see an overview of the transaction details and an overview of the signatures. You can also see that the status of the transaction is Unsubmitted, and you can see the identicon and the transaction hash.
Select Browse to file and then navigate to the location on your computer where you saved the signed transaction files. Select the relevant files, and then select OK. The files are uploaded to the Desktop Wallet and added to the list of signatures. Alternatively, you can drag and drop the signature files from their location on the computer and onto the Desktop Wallet.
Submit the transaction to the blockchain
When you have received and added all the required signatures, you can submit the transaction to the blockchain.
Review the transaction details carefully to ensure that all information is correct.
Select I understand this is the final submission and that it cannot be reverted.
If you don’t want to submit the transaction to the chain, you can select Cancel. The proposal is no longer active. However, it is still visible in the list of proposals.
Select Submit transaction to chain. The transaction is submitted to the chain and finalized on the ledger.
Select Finish to leave the page.
Note
Closing a pool does not mean that validation stops. You continue as a validator but only using your own stake. If you wish to stop being a validator, you must stop validation.
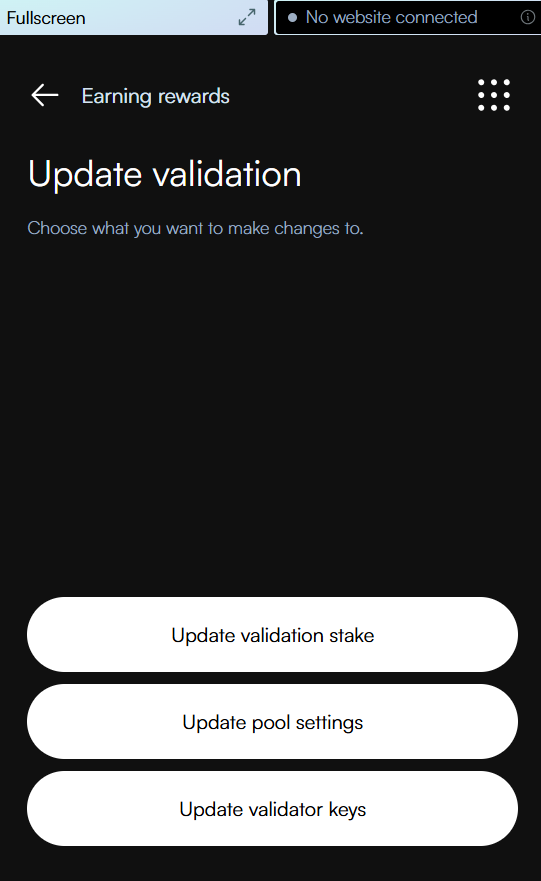
Update validator keys#
If you believe your validator keys have been compromised or lost, you can generate new validator keys. It is important to remember to update your validator keys on your node once you have exported them.
CryptoX Concordium Wallet
Tap the Earn button on the main screen.
On the validation screen, tap Update and then, Update validator keys.
Read through the information screen explaining the the options for updating validator settings. Tap Update validation at the bottom of the screen to proceed.
On the Update validator keys screen, tap continue to export the validator keys.
Warning
If you’re going to transfer the validator keys to someone else, make sure to do so through a secure channel. Generate new keys if you believe the keys have been compromised or lost.
Once you have saved the keys, review the information on the overview screen.
The CryptoX Concordium Wallet shows that the transaction has been submitted to the chain. Swipe right on the Update keys slider to submit the validation update.
The wallet shows a confirmation screen with a green checkmark indicating that your validation update has been successfully submitted to the chain. You can click Transaction details to view more information about the transaction, or Close to return to the main screen.
You need to import your validator keys file to your node in order to start producing blocks with the new keys. It is preferable to update them on the node as close to pay day as possible to prevent the node from being down as a validator for a longer time.
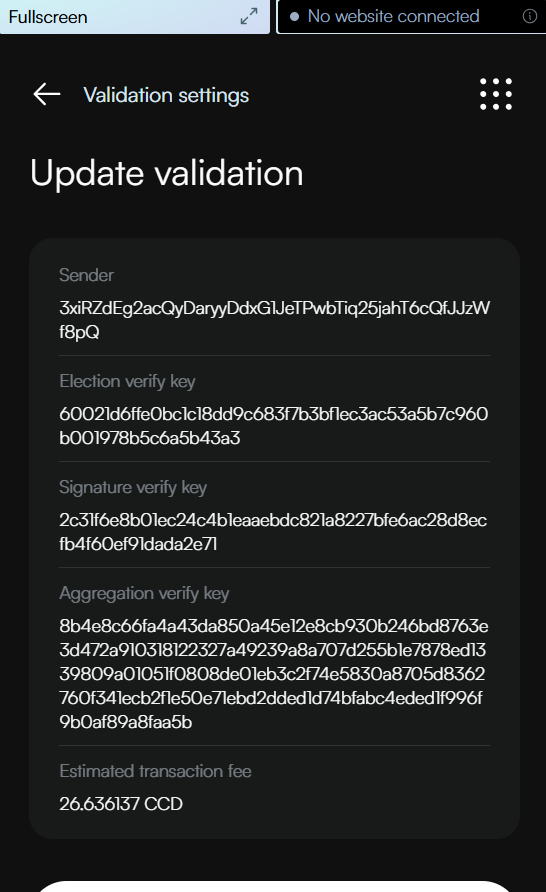
Concordium Wallet for Web
In the dropdown list, select the account for which you want to update the validator keys and click Earn.
On the next screen, click Update.
On the next screen, click Update validator keys. Review the information about updating validator keys and click Continue.
Click Export export as .json and the keys are automatically downloaded as validator-credentials.json to your default download folder. Click Continue to complete the transaction.
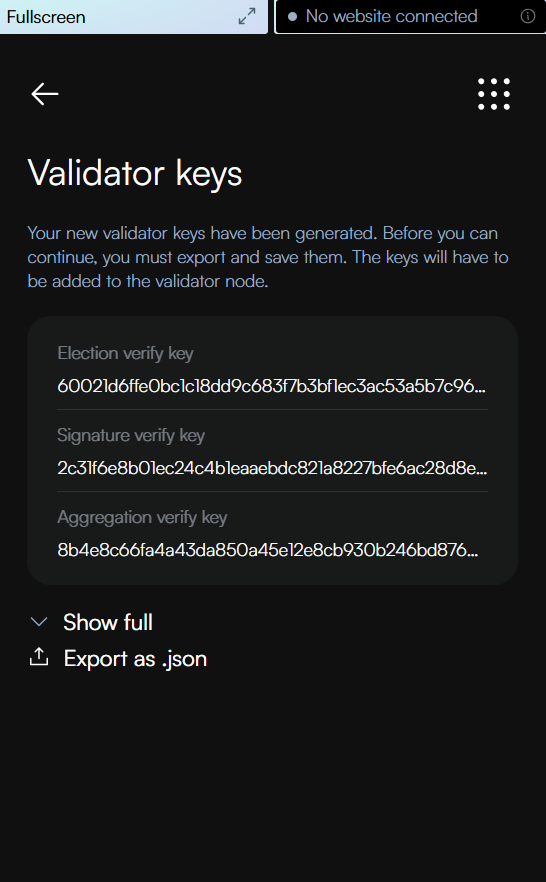
Once you have saved the keys, you see an overview screen of the add validator transaction. Review the information, then scroll down and click Send.
The wallet shows a confirmation screen with a green checkmark indicating that your validation settings have been successfully updated. You can click Transaction details to view more information about the transaction, or Return to account to return to your account overview.

You need to import your validator keys file to your node in order to start producing blocks. It is preferable to update them on the node as close to the next pay day as possible to prevent the node from being down as a validator for a longer time.
Desktop Wallet
Single signature account
Go to Accounts and select the account on which you have a staking pool that you want to update and click More options.
Select Validation.
Click Update validator keys.
You have to export the validator credentials so that you can restart the node with the new validator keys. Select Export validator credentials. If you’re running Windows make sure that All Files is selected in Save as type. Give the file a name and the extension .json, and then click Save and navigate to the place on your computer where you want to save the file.
Warning
This is the only time that you can export the credentials. If you’re going to transfer the validator keys to someone else, make sure to do so through a secure channel.
A message says Waiting for device. Please connect your Ledger. Connect the LEDGER device to the computer and enter your PIN on the LEDGER device.
Press the right button to navigate to the Concordium app, and then press both buttons to open the app. The LEDGER device says Concordium is ready. Wait for the message Ledger device is ready in the Desktop Wallet and click Submit.
On the LEDGER device, a message says Review transaction. Verify that the sender account is correct and navigate to the right. The LEDGER device says Update baker keys. Navigate to the right.
The LEDGER device says Sign transaction. Press both buttons to sign the transaction. The LEDGER device says Concordium is ready.
In the Desktop Wallet, you can see that the transaction has been submitted to the chain. Select Finish.
Multi signature account
Go to Multi Signature Transactions, and select Make new proposal, and then select Update Validator Keys.
Select the Account whose validator keys you want to update, and then select Continue. Only validator accounts are listed.
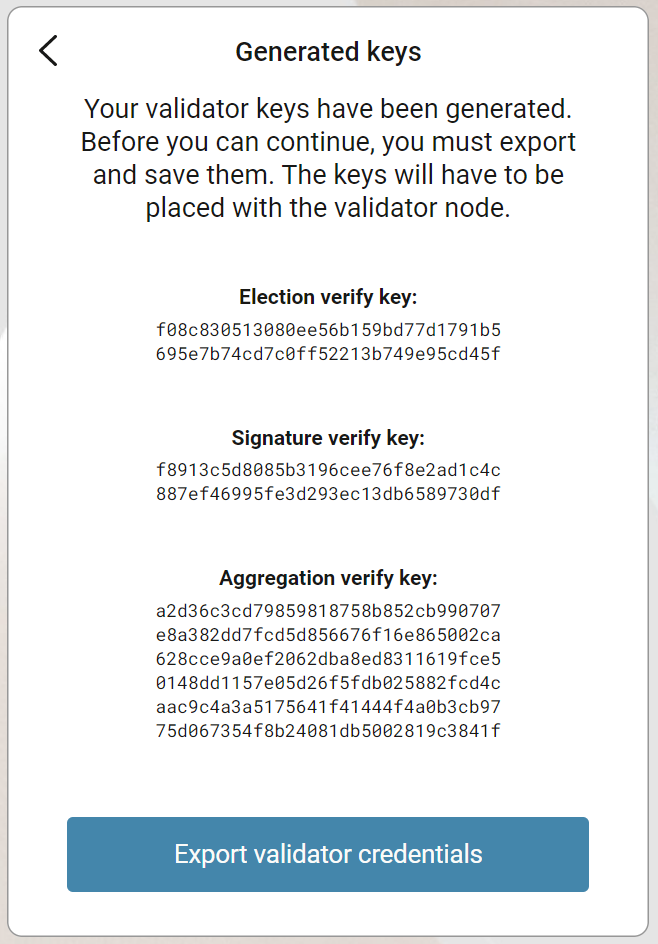
Set an expiry date and time for your proposal. You must set the expiry time so that the co-signers can return their signatures in time. Select Generate keys.
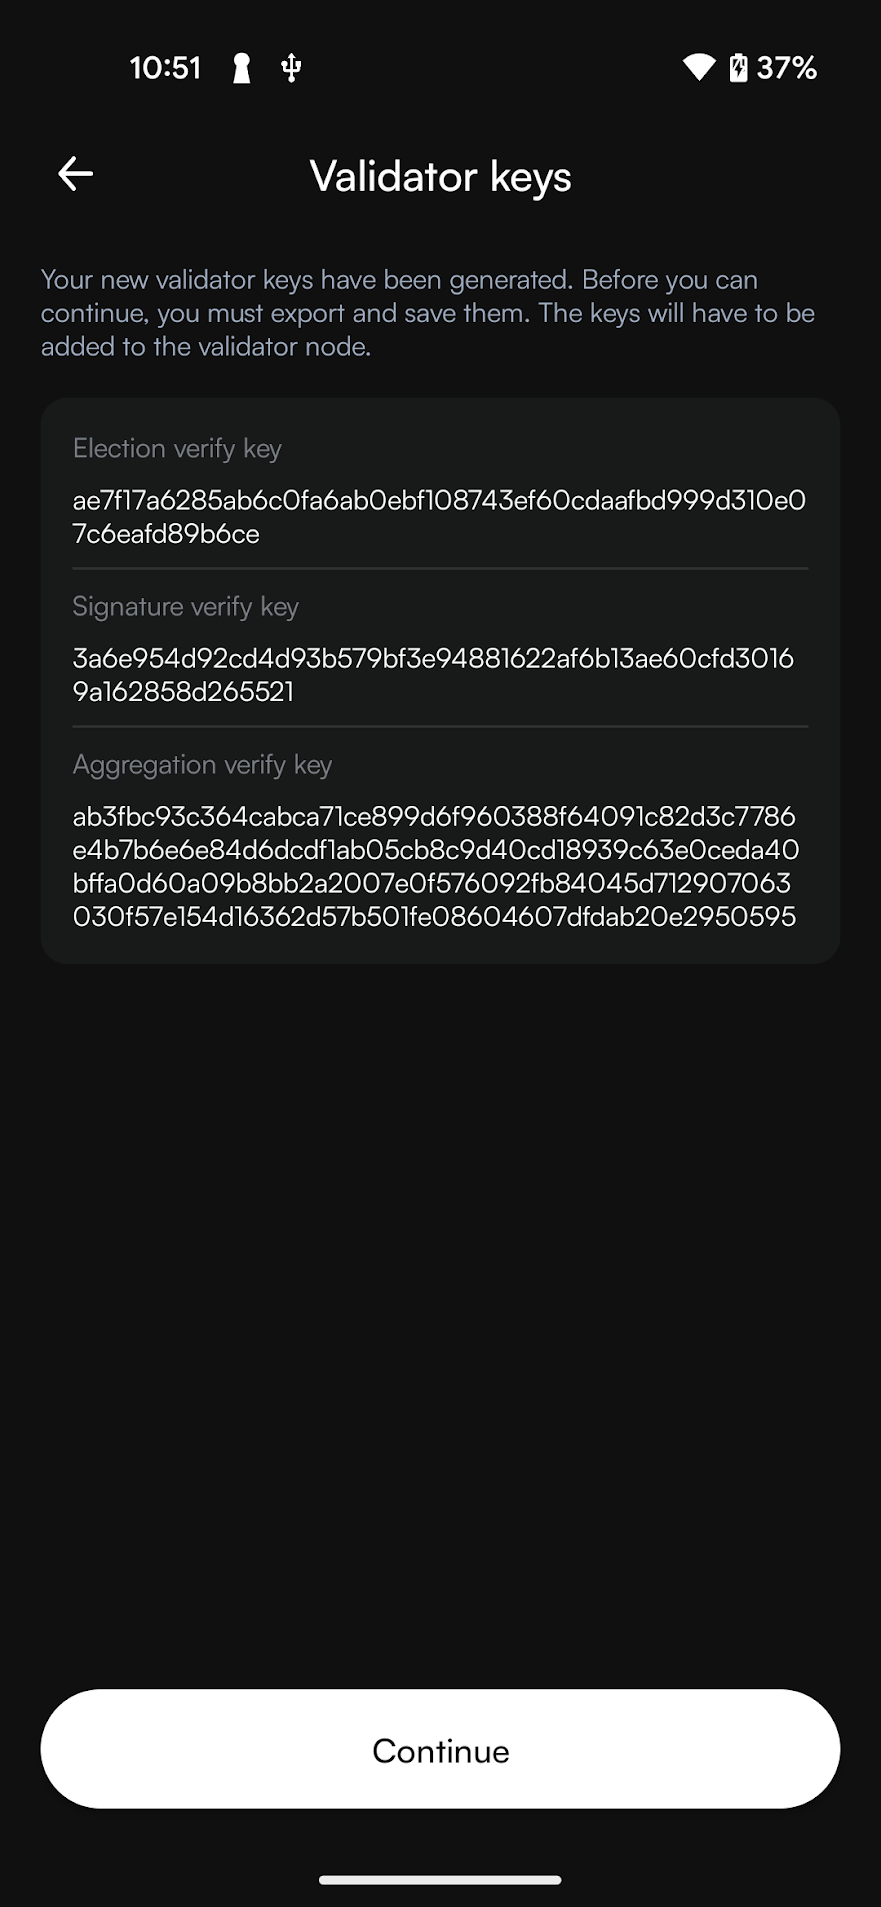
The validator keys are generated and you can view the transaction details in the left pane. You can see the identity, the account, and the expiry time of the transaction. You can also see the public validator keys.
You have to export the validator credentials so that you can restart the node with the new validator keys. Select Export validator credentials. If you’re on Windows make sure that All Files is selected in Save as type. Give the file a name and the extension .json, and then click Save and navigate to the place on your computer where you want to save the file.
Warning
This is the only time that you can export the credentials. If you’re going to transfer the validator keys to someone else make sure to do so through a secure channel.
Generate the Transaction
There are two ways that you can generate the transaction:
Generate the transaction without signing. This option enables you to export the transaction proposal without signing it. You don’t need a LEDGER device but you do need an internet connection.
Generate and sign the transaction on the LEDGER device. This option requires a LEDGER device and an internet connection.
In combination, these two options enable you to distribute the responsibility of creating and signing transfers among more people. You can, for example, have one person create the proposal and another one sign the proposal. It also makes it possible for you to sign the transaction on the Ledger in a different location than where the proposal was created.
Generate the transaction without signing
Verify that the Transaction details are as you intended, and then select I am sure that the proposed changes are correct.
Select Generate without signing. You can now export the proposal.
Generate and sign the transaction on the LEDGER device
If you haven’t connected the LEDGER device, there’s a message in the Desktop Wallet saying Waiting for connection until you connect the LEDGER device. Enter your PIN code on the LEDGER device. Press the buttons above the up and down arrows to choose a digit, and then press both buttons to select the digit.
Wait for the message in the Desktop Wallet saying Open the Concordium application on your Ledger device. On the LEDGER device, press the right button to navigate to the Concordium app, and then press both buttons to open the app. The LEDGER device says Concordium is ready. Wait for the message in the Desktop Wallet saying LEDGER device is ready.
In the Desktop Wallet, Verify that the Transaction details are as you intended, select I am sure that the proposed changes are correct, and then select Generate and Sign.
On the LEDGER device, there’s a message saying Review transaction. Verify that the sender account is correct, and navigate to the right. The LEDGER device says Update baker keys. Navigate to the right.
The LEDGER device says Sign transaction. Press both buttons to sign the transaction. The LEDGER device says Concordium is ready.
Note
If you want to decline the transaction, press the right button on the LEDGER device. The hardware wallet now says Decline to sign transaction. Press both buttons to decline. In the Desktop Wallet, there’s a message saying The action was declined on the Ledger device. Please try again.
In the Desktop Wallet, you can now see Transaction details, Signatures, and Security & Submission Details, which include the status of the transaction, the identicon, and the transaction hash. If you have all the required signatures, you can submit the transaction to the chain. Otherwise, you’ll have to export the proposal and receive signatures from the co-signers.
Export a transaction proposal
If more than one signature is needed to sign off on the proposal, you have to share a file of the type JSON, which contains the transaction information, with the co-signers.
In the Desktop Wallet, select Export transaction proposal.
Navigate to the location on your computer where you want to save the file. If you’re on Windows make sure that All Files is selected in Save as type. Give the file a name and the extension .json, and then click Save.
You have to export the transaction proposal and send it to the co-signer through a secure channel. Optionally, you can also send the Identicon to the co-signers through a different secure channel.
Receive signatures from co-signers
When the co-signers have signed the transaction, they return the signed transaction proposal to you, and you have to import the files into the Desktop Wallet before you can submit the transaction to the chain.
If you’re still on the same page, go to step 3. If you left the page with the account transaction, go to Multi-signature Transactions, and then select Your proposed transactions.
Select the transaction that you want to submit to the chain. You can see an overview of the transaction details and an overview of the signatures. You can also see that the status of the transaction is Unsubmitted, and you can see the identicon and the transaction hash.
Select Browse to file and then navigate to the location on your computer where you saved the signed transaction files. Select the relevant files, and then select OK. The files are uploaded to the Desktop Wallet and added to the list of signatures. Alternatively, you can drag and drop the signature files from their location on the computer and onto the Desktop Wallet.
Submit the transaction to the blockchain
When you have received and added all the required signatures, you can submit the transaction to the blockchain.
Review the transaction details carefully to ensure that all information is correct.
Select I understand this is the final submission and that it cannot be reverted.
If you don’t want to submit the transaction to the chain, you can select Cancel. The proposal is no longer active but still visible in the list of proposals.
Select Submit transaction to chain. The transaction is submitted to the chain and finalized on the ledger.
Select Finish to leave the page.
