Sponsored Transactions Smart Contract#
At a glance
This part of the tutorial shows you how a CIS-3 smart contract implements sponsored transactions using Ed25519 signature verification, allowing a backend to submit transactions on behalf of token holders. You will need Rust and cargo-concordium. When you are done, you will understand how permit-based sponsorship works in a Concordium smart contract and have a compiled, deployable module.
The goal of this part of the tutorial is to understand how the sponsored transaction mechanism is implemented in the smart contract and how to create and verify an Ed25519 signature in the smart contract code.
Clone the sponsored transaction example
which you will modify in this tutorial. The recurse-submodules flag is needed because the git repository contains submodules which need to be cloned along with the example.
$ git clone --recurse-submodules [email protected]:Concordium/concordium-rust-smart-contracts.git
Navigate to the correct example folder:
$ cd ./examples/cis3-nft-sponsored-txs
The cis3_nft contract implements the CIS-3 standard (sponsored transactions). The standard defines that the contract has to expose the
permit and the supportsPermit functions.
permit function#
The permit function verifies an ed25519 signature from a sponsoree and authorizes the sponsor to execute the logic of
specific entrypoints (transfer/updateOperator in the example code) on behalf of the sponsoree. The sponsored transaction mechanism replaces
the authorization checks conducted on the sender/invoker variable with signature verification.
That is, the sponsoree needs to sign a message (indicating its intended action), then
anyone can invoke the permit function with this signed message to execute the sponsoree’s intended action.
The smart contract logic checks if the signature was generated by the sponsoree with the check_account_signature host function.
This function looks up the public key/keys associated with the signer address and verifies that the signer has generated the signature by signing the message_hash.
// Check signature.
let valid_signature = host.check_account_signature(param.signer, ¶m.signature, &message_hash)?;
ensure!(valid_signature, CustomContractError::WrongSignature.into());
Note
Ed25519 is an elliptic curve signing algorithm using EdDSA and Curve25519. It belongs to asymmetric cryptography, also known as public-key cryptography, where you generate a pair of related keys – one public key and one private key. The sponsoree signs a message with its private key and anyone can verify the sponsoree’s signature using its public key. The public key is shared with other entities (e.g., the smart contract) while the private key is only known to the sponsoree. The smart contract needs to know the public key to be able to verify that the sponsoree signed the message with the corresponding private key.
Note
The Concordium Wallet for Web prepends the message with the account address (signer) and 8 zero bytes before signing it.
This ensures that signed messages (prepended with 8 zero bytes and the account address) can be distinguished from transactions (prepended with the account nonce and the account address).
The smart contract logic reverse engineers the Concordium Wallet for Web implementation by equally prepending the account address (signer) and 8 zero bytes to the message.
Note
Concordium accounts can be multi-sig and each account has at least one public key and at least
one private key associated with it.
For this sponsored transactions example, the accounts in the Concordium Wallet for Web (or Concordium Wallet for Mobile)
have exactly one public key and exactly one private key (no multi-sig accounts).
You use your private key to sign the message in the wallet and your public key is
used in the smart contract to verify that this signature was generated in the wallet with the associated private key.
Never share your private key.
supportsPermit function#
This function can be queried with a list of given entrypoint names. The response contains corresponding results for each entrypoint, where the result is either “Entrypoint is not supported and can not be invoked via the permit function using the sponsored transaction mechanism” or “Entrypoint is supported and can be invoked via the permit function using the sponsored transaction mechanism”.
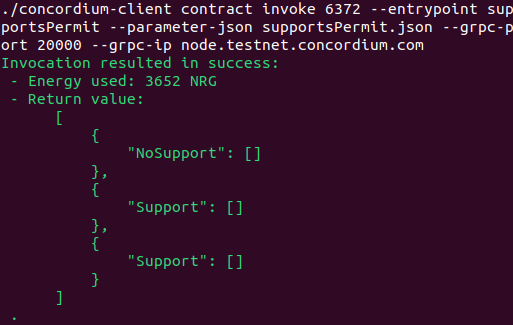
You can explore the function by invoking it with the concordium-client as follows:
$ concordium-client contract invoke 6372 --entrypoint supportsPermit --parameter-json supportsPermit.json --grpc-port 20000 --grpc-ip grpc.testnet.concordium.com --secure
6372 is the index of the smart contract. A smart contract address consists of an index and a subindex, in the current protocol the subindex will always be 0. So, in other words, the command above means invoke contract with index 6372 on the testnet.
For example, this supportsPermit.json file results in the below screenshot.
{"queries":["aaaa","transfer","updateOperator"]}
Note
Comprehensive instructions on how to download and set up concordium-client can be found in Setup the development environment.
Nonces registry#
The smart contract has a registry to link an account to its next nonce.
The nonce is increased sequentially every time a signed message (corresponding to the account) is successfully executed in the permit function.
The nonce is used to prevent replay attacks of the signed message because only a message signed with the next nonce in sequence can be executed as seen below:
// Check the nonce to prevent replay attacks.
ensure_eq!(message.nonce, nonce, CustomContractError::NonceMismatch.into());
Testing the signature verification#
In this section, you will learn how to create an Ed25519 signature that you can use for your test cases to confirm that the smart contract signature verification logic works as expected.
Note
The commands in this section have to be executed from the ./examples/cis3-nft-sponsored-txs folder where the Cargo.toml file is defined for this project.
Run the test cases to confirm that they pass before you start modifying the code:
$ cargo test
or
$ cargo concordium test
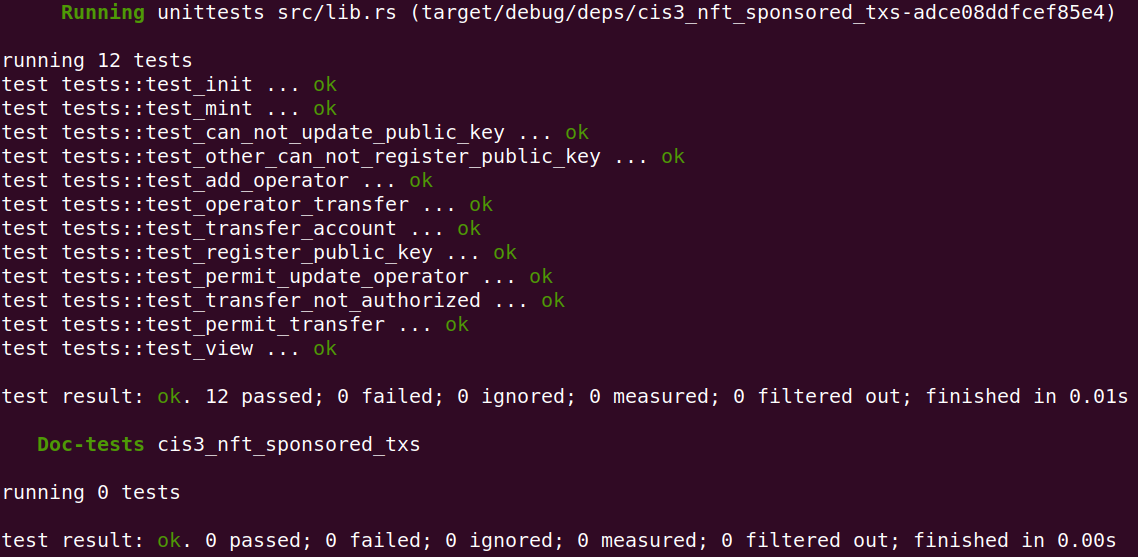
You should see no errors and all the test cases are green indicating that they passed successfully.
Note
Comprehensive instructions on how to download and set up cargo concordium can be found in Setup the development environment.
The next few commands explain how you can display the message_hash that you would need to sign.
Add the following to the smart contract permit function after the variable message_hash is defined.
println!("Message hash: {}", HashSha2256(message_hash));
This prints the message_hash when running the test cases as follows:
$ cargo test -- --nocapture
To learn more about the nocapture flag you can follow this link

The test cases have two tests (test_permit_transfer/test_permit_update_operator) that execute the permit function, and that is why you see two message_hashes printed out in the console. You can comment out one of the tests to not get confused about
which message you are going to sign. You need to generate a public-private key pair to sign this message_hash.
You can use an Ed25519 signature generation tool for testing to generate such keys and signatures.
Note
Only use these online tools that generate private keys for you in your test cases. Don’t use the key in a production setting, since the private key might be known to the online webpage provider and should not be considered safe.
Copy the message_hash into the message field and switch the Msg Encoding to hex (not text).
Click the Generate Random Key button and click the Sign button.
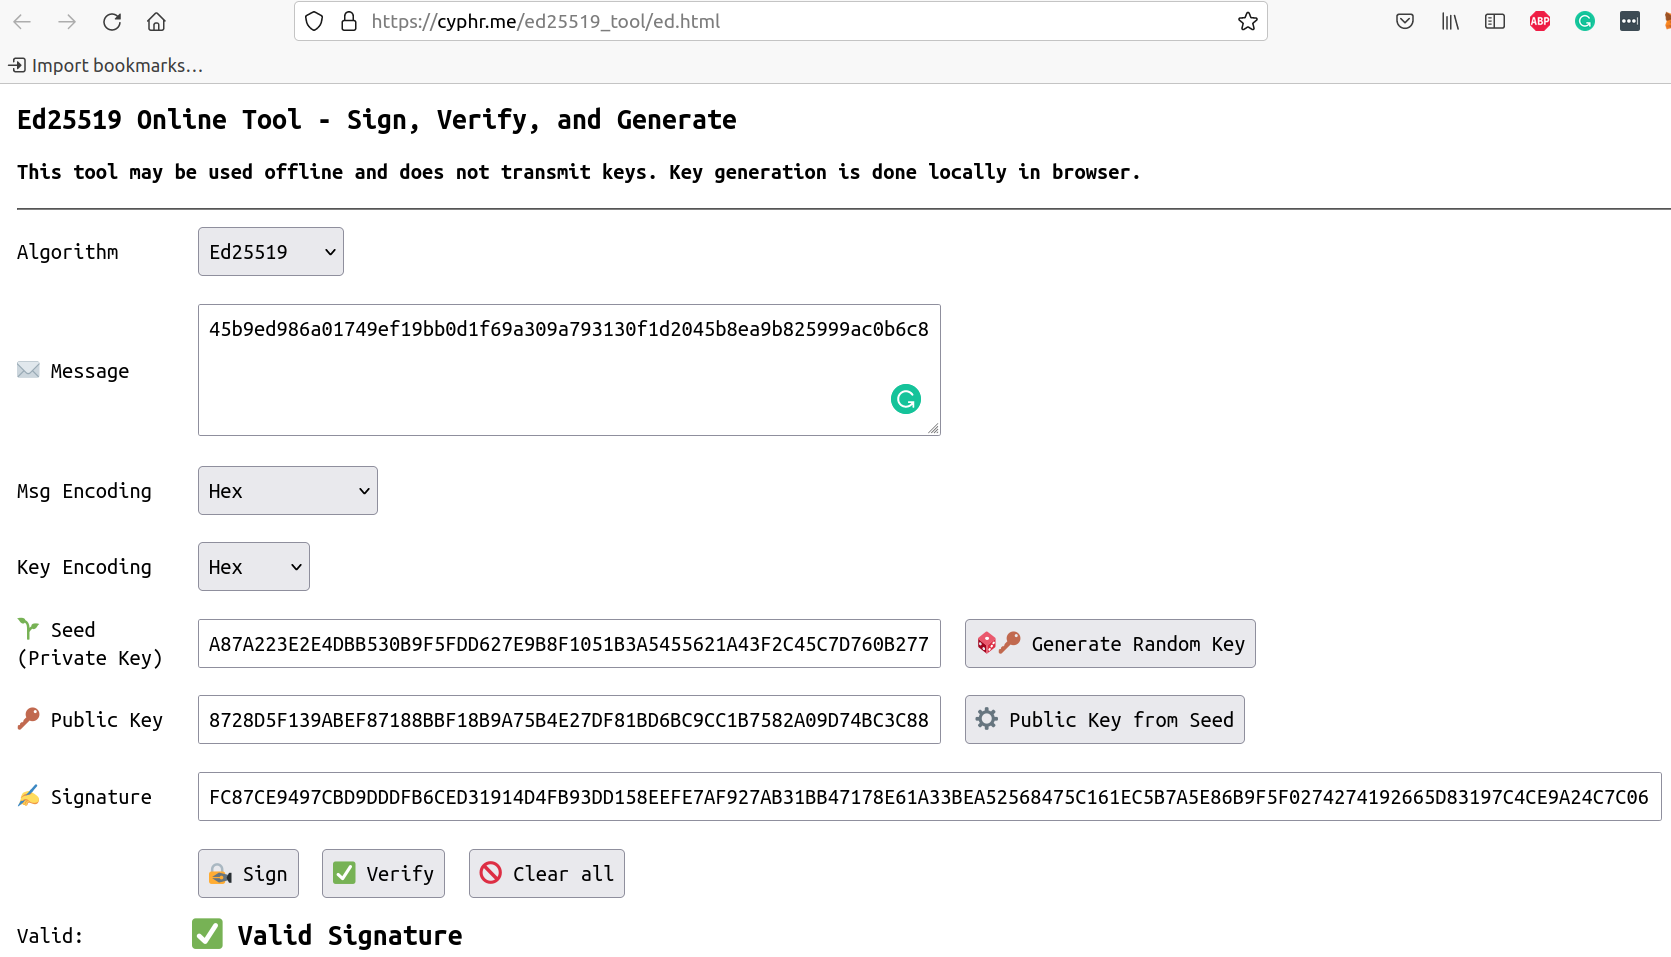
This action generates a signature in the last field in the above screenshot.
The signature and public key in the above screenshot can be copied into the below code snippets to decode them to bytes.
let signature:SignatureEd25519 = "FC87CE9497CBD9DDDFB6CED31914D4FB93DD158EEFE7AF927AB31BB47178E61A33BEA52568475C161EC5B7A5E86B9F5F0274274192665D83197C4CE9A24C7C06".parse().unwrap();
println!("Signature: {:?}", signature.0);
Add the above code snippet to the top of a test case and run the test cases again to output the signature in bytes.
$ cargo test -- --nocapture
The output should look similar to:
$ signature: [252, 135, 206, 148, 151, 203, 217, 221, 223, 182, 206, 211, 25, 20, 212, 251, 147, 221, 21, 142, 239, 231, 175, 146, 122, 179, 27, 180, 113, 120, 230, 26, 51, 190, 165, 37, 104, 71, 92, 22, 30, 197, 183, 165, 232, 107, 159, 95, 2, 116, 39, 65, 146, 102, 93, 131, 25, 124, 76, 233, 162, 76, 124, 6]
You can create the below signature constant. This signature can be used in test cases to check if your signature verification logic in the smart contract works.
const SIGNATURE: SignatureEd25519 = SignatureEd25519([252, 135, 206, 148, 151, 203, 217, 221, 223, 182, 206, 211, 25, 20, 212, 251, 147, 221, 21, 142, 239, 231, 175, 146, 122, 179, 27, 180, 113, 120, 230, 26, 51, 190, 165, 37, 104, 71, 92, 22, 30, 197, 183, 165, 232, 107, 159, 95, 2, 116, 39, 65, 146, 102, 93, 131, 25, 124, 76, 233, 162, 76, 124, 6]);
The public key from the above screenshot can be converted in a similar fashion.
let public_key:PublicKeyEd25519 = "8728D5F139ABEF87188BBF18B9A75B4E27DF81BD6BC9CC1B7582A09D74BC3C88".parse().unwrap();
println!("Public key: {:?}", public_key.0);
Add the above code snippet to the top of a test case and run the test cases again to output the public key in bytes.
$ cargo test -- --nocapture
The output should look similar to:
$ public_key: [135, 40, 213, 241, 57, 171, 239, 135, 24, 139, 191, 24, 185, 167, 91, 78, 39, 223, 129, 189, 107, 201, 204, 27, 117, 130, 160, 157, 116, 188, 60, 136]
You can create the below public key constant. This public key can be used in test cases to check if your signature verification logic in the smart contract works.
const PUBLIC_KEY: PublicKeyEd25519 = PublicKeyEd25519([135, 40, 213, 241, 57, 171, 239, 135, 24, 139, 191, 24, 185, 167, 91, 78, 39, 223, 129, 189, 107, 201, 204, 27, 117, 130, 160, 157, 116, 188, 60, 136]);
