Interacting with the wCCD token protocol#
Note
Before you start with part 2 of this tutorial, make sure you have:
access to a testnet node
the
concordium-clientversion 5.0.1 or greater installedan account created in the wallet that is funded with some CCD
the keys from the wallet imported into the
concordium-clientconfiguration
If you haven’t completed any of the above steps,
Setup the development environment
will guide you through these setup steps.
If you haven’t completed any of the above steps, you can continue
with part 3 of this tutorial. However, it is recommended
to complete every part of this tutorial in the given order.
You need an up-to-date concordium-client version because the wCCD smart contract uses the newest schema_V3.
Query (non-state-mutative) functions#
The protocol has four query functions (balanceOf, operatorOf, tokenMetadata, and supports)
that you can invoke on the wCCD contract. Because the schema is already embedded,
the input parameters can be provided with the --parameter-json flag.
Note
The wCCD smart contract has its schemas embedded and you will not have to provide any schemas with the --schema flag.
You can read more about schemas in this section.
Getting the CCD balance of an address#
Checking the CCD balance of an account (click here)
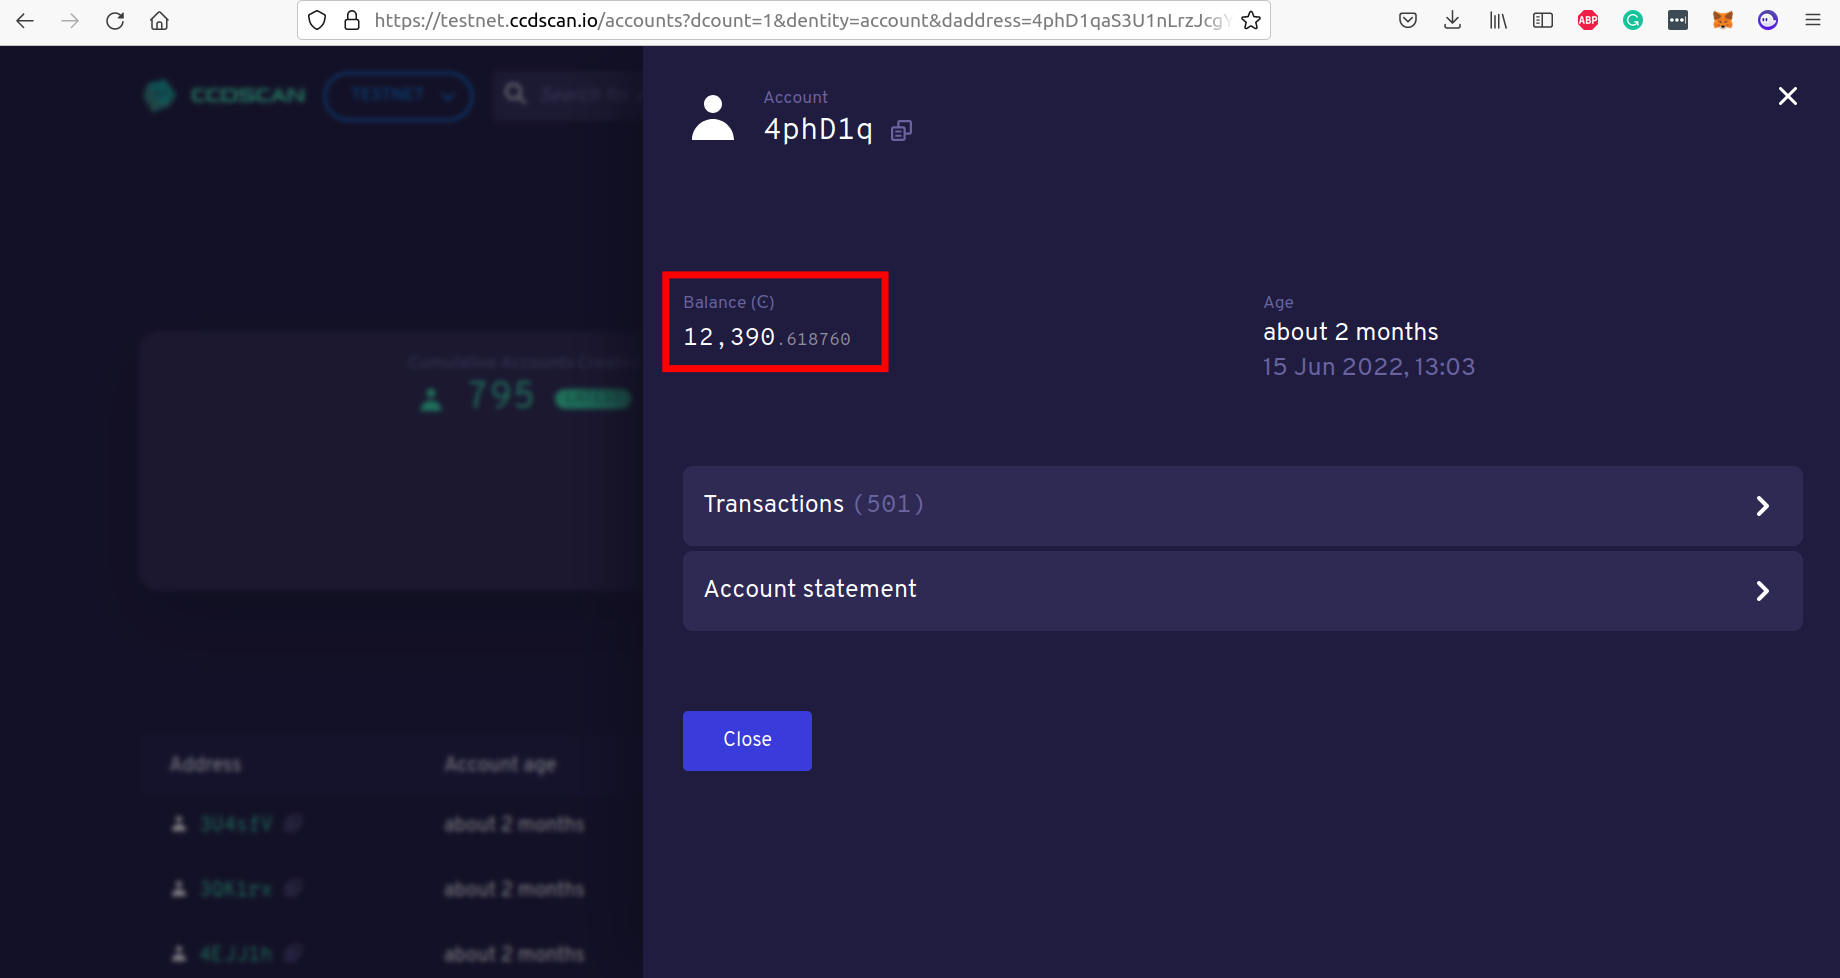
You can check the CCD balance of an account on CCDScan.

You can check the CCD balance of an account with this command:
$ concordium-client account show ACCOUNT --grpc-port 20001

Checking the CCD balance of a smart contract (click here)
Note
The smallest unit of CCD is 1 micro CCD and equals 10−6 (one millionth) of a CCD. CCD has 6 decimal places. 1 CCD is represented by the balance value of 1,000,000 micro CCD on the blockchain and is worth the equivalent of a balance value of 1,000,000 micro wCCD.
The balanceOf function#
Input parameters for the balanceOf function (click here)
Create a balanceOf.json file and insert the following JSON array.
[
    {
        "address": {
            "Enum": [
                {
                    "Account": [
                        ACCOUNT_ADDRESS
                    ]
                },
                {
                    "Contract": [
                        {
                            "index": INDEX,
                            "subindex": SUBINDEX
                        }
                    ]
                }
            ]
        },
        "token_id": TOKEN_ID
    }
]
Note
You can query the balance of several addresses in the above array.
If you insert an account address correctly, the JSON array should look similar to the below JSON array.
[
    {
        "address": {
            "Account": [
                "4phD1qaS3U1nLrzJcgYyiPq1k8aV1wAjTjYVPE3JaqovViXS4j"
            ]
        },
        "token_id": ""
    }
]
If you insert a smart contract address correctly, the JSON array should look similar to the below JSON array.
[
    {
        "address": {
            "Contract": [
                {
                    "index": 844,
                    "subindex": 0
                }
            ]
        },
        "token_id": ""
    }
]
You are ready now to invoke the balanceOf function with the following command.
$ concordium-client contract invoke WCCD_CONTRACT_INDEX --entrypoint balanceOf --parameter-json balanceOf.json --grpc-port 20001

The operatorOf function#
Input parameters for the operatorOf function (click here)
Create an operatorOf.json file and insert the following JSON array.
[
    {
        "address": {
            "Enum": [
                {
                    "Account": [
                        ACCOUNT_ADDRESS
                    ]
                },
                {
                    "Contract": [
                        {
                            "index": INDEX,
                            "subindex": SUBINDEX
                        }
                    ]
                }
            ]
        },
        "owner": {
            "Enum": [
                {
                    "Account": [
                        ACCOUNT_ADDRESS
                    ]
                },
                {
                    "Contract": [
                        {
                            "index": INDEX,
                            "subindex": SUBINDEX
                        }
                    ]
                }
            ]
        }
    }
]
Note
You can query several sets of addresses in the above array.
If you insert everything correctly, the JSON array should look similar to the below JSON array.
[
    {
        "address": {
            "Account": [
                "4DH219BXocxeVByKpZAGKNAJx7s2w1HFpwaNu1Ljd1mXFXig22"
            ]
        },
        "owner": {
            "Account": [
                "4phD1qaS3U1nLrzJcgYyiPq1k8aV1wAjTjYVPE3JaqovViXS4j"
            ]
        }
    }
]
You are ready now to invoke the operatorOf function with the following command.
$ concordium-client contract invoke WCCD_CONTRACT_INDEX --entrypoint operatorOf --parameter-json operatorOf.json --grpc-port 20001

The tokenMetadata function#
Input parameters for the tokenMetadata function (click here)
Create a tokenMetadata.json file and insert the following JSON array.
[""]
Note
This empty string is required because of the CIS-2 token standard. The tokenId of the wCCD token is the smallest unit possible (an empty string).
You are ready now to invoke the tokenMetadata function with the following command.
$ concordium-client contract invoke WCCD_CONTRACT_INDEX --entrypoint tokenMetadata --parameter-json tokenMetadata.json --grpc-port 20001

The supports function#
Input parameters for the supports function (click here)
Create a supports.json file and insert the following example JSON array. It will query if
the two token standards (CIS-0 and CIS-2) are supported by the wCCD token.
["CIS-0","CIS-2"]
Note
You can find more information about the CIS-0 standard and the CIS-2 standard.
You are ready now to invoke the supports function with the following command.
$ concordium-client contract invoke WCCD_CONTRACT_INDEX --entrypoint supports --parameter-json supports.json --grpc-port 20001
The below screenshot shows the response of querying if the wCCD
token contract supports the following standards
["12345","CIS-0","CIS-2"]. Its response is that it does
not support the standard 12345 but it supports the CIS-0 and the CIS-1 standards.

State-mutative functions#
The protocol has four state-mutative functions (wrap, unwrap,
transfer, and updateOperator) that you can invoke on the wCCD smart contract.
Because the schema is already embedded,
the input parameters can be provided with the --parameter-json flag.
Note
The wCCD smart contract has its schemas embedded and you will not have to provide any schemas with the --schema flag.
You can read more about schemas in this section.
The wrap function#
Wrapping CCD refers to the process of converting the native currency CCD into
a CIS-2 compliant token (wCCD) at a 1:1 ratio by sending CCD to the wCCD smart
contract and getting wCCD in return.
You can specify with the --amount flag how much CCD you want to wrap.
Create a wrap.json file and insert the JSON object
from option 1 (Receiver is an account) or option 2 (Receiver is a smart contract).
Option 1 (Receiver is an account) (click here)
{
    "data": DATA_STRING,
    "to": {
        "Account": [
            ACCOUNT_ADDRESS
        ]
    }
}
The DATA_STRING is only relevant if wCCD is sent to a smart contract as described in option 2.
You can use your account address if you want to credit the wCCD to your own account.
If you insert your account address correctly, the JSON object should look similar to the below JSON object.
{
    "data": "",
    "to": {
        "Account": [
            "4phD1qaS3U1nLrzJcgYyiPq1k8aV1wAjTjYVPE3JaqovViXS4j"
        ]
    }
}
Option 2 (Receiver is a smart contract) (click here)
{
    "data": DATA_STRING,
    "to": {
        "Contract": [
            {
                "index": INDEX,
                "subindex": SUBINDEX
            },
            ENTRYPOINT_NAME
        ]
    }
}
Some additional bytes (encoded as a lowercase hex string called DATA_STRING)
are used in the OnReceivingCis2 hook. This hook is executed only if the to address is a
contract and the to address is not the invoker of the wrap function.
The OnReceivingCis2 hook invokes the ENTRYPOINT_NAME on the smart contract INDEX with
the OnReceivingCis2Params parameters which include the above DATA_STRING.
This action allows the receiving smart contract to
react to the credited wCCD amount. You can keep the data field empty
if you don’t want to send any additional data to the receiving smart contract.
Note
In programming, a hook is an interface provided in packaged code
that allows a programmer to insert customized programming code to either
provide a different behavior or to react when something happens.
The OnReceivingCis2 hook allows a smart contract developer to code a
smart contract A that taps into the transfer or wrap functions of the wCCD smart
contract. Smart contract A can insert some custom logic/behavior if the transfer or wrap functions
are invoked and would result in the smart contract A getting credited some wCCD.
The ENTRYPOINT_NAME is an attribute that is added above each function
in the smart contract code as shown below using the example entrypoint name receiveToken.
#[receive(contract = "contractName", name = "receiveToken")]
fn contract_receive_token( ... ) ... { ... }
You can use the smart contract deployed at index 844 on testnet and
its function entry point name receiveToken for testing.
{
    "data": "",
    "to": {
        "Contract": [
            {
                "index": 844,
                "subindex": 0
            },
            "receiveToken"
        ]
    }
}
Before you execute the wrap function, check
the CCD balance of your SENDER_ACCOUNT (the account that initiates the transaction) and the wCCD smart contract as described here.
The wrap function will send some CCD from your SENDER_ACCOUNT account to the wCCD smart contract contract.
Note
This tutorial is also used by other people and they might at the same time interact with the smart contracts and change their CCD or wCCD balances.
Before you execute the wrap function, check
the wCCD balance of the to address with the balanceOf function.
The to address will receive some wCCD
because the wrap function will credit some wCCD to the to address.
You are ready now to wrap your CCD into wCCD with the following command.
The --energy flag specifies the maximum amount of NRG to be spent on the transaction
and can be used to set an upper limit of the transaction fee that you are
willing to spend when interacting with the blockchain.
$ concordium-client contract update WCCD_CONTRACT_INDEX --entrypoint wrap --parameter-json wrap.json --amount AMOUNT --sender SENDER_ACCOUNT --energy 25000 --grpc-port 20001
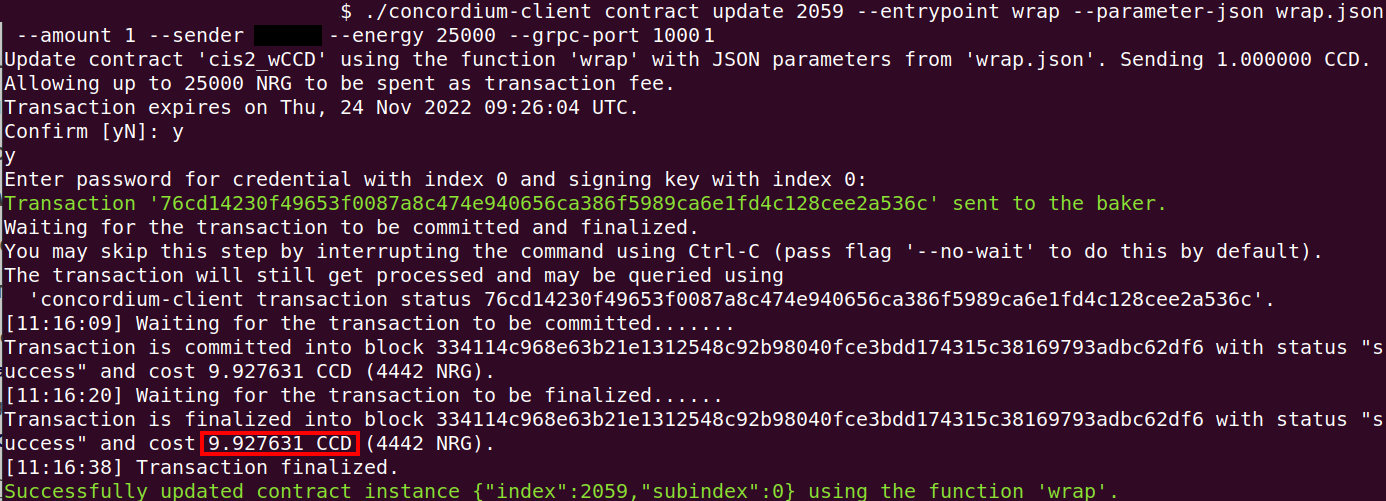
The below screenshot shows the wrapping of 1 CCD (1,000,000 micro CCDs) into 1,000,000 micro wCCD.

Confirm that the CCD balance of the SENDER_ACCOUNT was decreased
by AMOUNT and that the CCD balance of the wCCD smart contract contract was increased by AMOUNT.
Note
Keep in mind that the SENDER_ACCOUNT also paid some CCD as transaction fees.
The amount of transaction fees can be seen as shown in the above screenshot.
Confirm that the wCCD balance of the to address increased by AMOUNT.
The unwrap function#
Unwrapping CCD refers to the opposite process of converting the CIS-2
compliant wCCD token at a 1:1 ratio back to the native currency CCD by burning the
wCCD token in the wCCD smart contract and getting CCD in return.
Input parameters for the unwrap function (click here)
Create an unwrap.json file and insert the below JSON object.
{
    "amount": AMOUNT,
    "data": DATA_STRING,
    "owner": {
        "Enum": [
            {
                "Account": [
                    ACCOUNT_ADDRESS
                ]
            },
            {
                "Contract": [
                    {
                        "index": INDEX,
                        "subindex": SUBINDEX
                    }
                ]
            }
        ]
    },
    "receiver": {
        "Enum": [
            {
                "Account": [
                    ACCOUNT_ADDRESS
                ]
            },
            {
                "Contract": [
                    {
                        "index": INDEX,
                        "subindex": SUBINDEX
                    },
                    ENTRYPOINT_NAME
                ]
            }
        ]
    }
}
If you insert everything correctly, the JSON object should look similar to the below JSON object that will unwrap 1,000,000 micro wCDD from an account and send the received CCDs back to the same account.
{
    "amount": "1000000",
    "data": "",
    "owner": {
        "Account": [
            "4phD1qaS3U1nLrzJcgYyiPq1k8aV1wAjTjYVPE3JaqovViXS4j"
        ]
    },
    "receiver": {
        "Account": [
            "4phD1qaS3U1nLrzJcgYyiPq1k8aV1wAjTjYVPE3JaqovViXS4j"
        ]
    }
}
Before you execute the unwrap function, check
the CCD balance of the receiver address and the wCCD smart contract as described here.
The unwrap function will send some CCD from the wCCD smart contract to the receiver address.
Before you execute the unwrap function, check
the wCCD balance of the owner address with the balanceOf function.
The owner address will get its wCCD balance reduced
because the unwrap function will burn some wCCD from the owner address.
The owner has to have at least a balance of AMOUNT in wCCD tokens
and the SENDER_ACCOUNT has to be the owner address or be an operator of the owner address.
You are ready now to unwrap your wCCD into CCD with the following command.
$ concordium-client contract update WCCD_CONTRACT_INDEX --entrypoint unwrap --parameter-json unwrap.json --sender SENDER_ACCOUNT --energy 25000 --grpc-port 20001
The below screenshot shows the execution of the unwrap function.

Confirm that the CCD balance of the receiver was increased
by AMOUNT (specified in the unwrap.json file) and that the CCD
balance of the wCCD smart contract was decreased by AMOUNT.
Confirm that the wCCD balance of the owner address decreased by AMOUNT specified in the unwrap.json file.
The transfer function#
You can transfer the wCCD tokens from one address to another address.
Input parameters for the transfer function (click here)
Create a transfer.json file and insert the below JSON array.
[
    {
        "amount": AMOUNT,
        "data": DATA_STRING,
        "from": {
            "Enum": [
                {
                    "Account": [
                        ACCOUNT_ADDRESS
                    ]
                },
                {
                    "Contract": [
                        {
                            "index": INDEX,
                            "subindex": SUBINDEX
                        }
                    ]
                }
            ]
        },
        "to": {
            "Enum": [
                {
                    "Account": [
                        ACCOUNT_ADDRESS
                    ]
                },
                {
                    "Contract": [
                        {
                            "index": INDEX,
                            "subindex": SUBINDEX
                        },
                        ENTRYPOINT_NAME
                    ]
                }
            ]
        },
        "token_id": TOKEN_ID
    }
]
Note
You can execute several transfers in the above array.
If you insert everything correctly, the JSON array should look similar to the below JSON array that will transfer 1 micro wCCD from an account address to another account address.
[
    {
        "amount": "1",
        "data": "",
        "from": {
            "Account": [
                "4phD1qaS3U1nLrzJcgYyiPq1k8aV1wAjTjYVPE3JaqovViXS4j"
            ]
        },
        "to": {
            "Account": [
                "4DH219BXocxeVByKpZAGKNAJx7s2w1HFpwaNu1Ljd1mXFXig22"
            ]
        },
        "token_id": ""
    }
]
Before you execute the transfer function, check
the wCCD balance of the from address and the to address with the balanceOf function.
The transfer function will send some wCCD from the from address to the to address.
The from address has to have at least a balance of AMOUNT in wCCD tokens
and the SENDER_ACCOUNT has to be the from address or be an operator of the from address.
You are ready now to transfer your wCCD to another address with the following command.
$ concordium-client contract update WCCD_CONTRACT_INDEX --entrypoint transfer --parameter-json transfer.json --sender SENDER_ACCOUNT --energy 25000 --grpc-port 20001
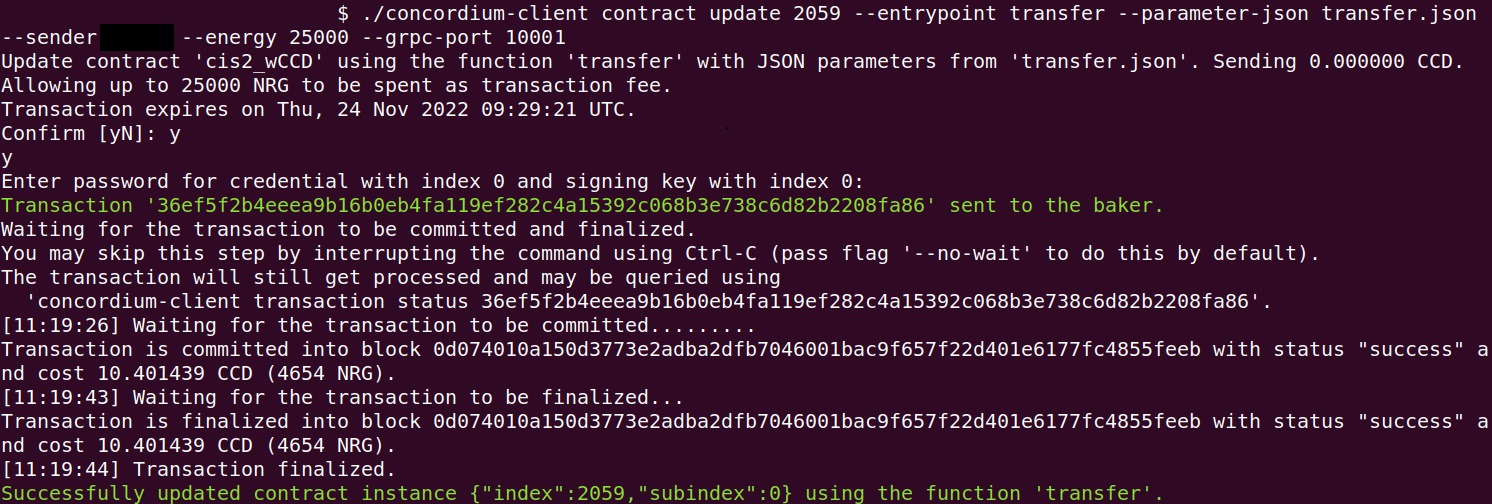
The below screenshot shows the execution of the transfer function.

Confirm that the wCCD balance of the to address was increased
by AMOUNT (specified in the transfer.json file) and that the wCCD
balance of the from address was decreased by AMOUNT.
The updateOperator function#
You can add one or more operator addresses to an address that you control.
These operators have access to your wCCD tokens
at that address and can transfer or unwrap them on your behalf.
You should only add operator addresses that you trust. The updateOperator function allows you
to add and remove operators.
For example, a smart contract address is often added as an operator so it can
access your tokens to perform some smart contract operations
without you having to interact with the smart contract again.
Input parameters for the updateOperator function (click here)
Create an updateOperator.json file and insert the below JSON array.
[
    {
        "operator": {
            "Enum": [
                {
                    "Account": [
                        ACCOUNT_ADDRESS
                    ]
                },
                {
                    "Contract": [
                        {
                            "index": INDEX,
                            "subindex": SUBINDEX
                        }
                    ]
                }
            ]
        },
        "update": {
            "Enum": [
                {
                    "Remove": []
                },
                {
                    "Add": []
                }
            ]
        }
    }
]
Note
You can add/remove several operator addresses in the above array.
If you insert everything correctly, the JSON array should look similar to
the below JSON array that will add the account address 4DH219B… as
an operator to the SENDER_ACCOUNT.
[
    {
        "operator": {
            "Account": [
                "4DH219BXocxeVByKpZAGKNAJx7s2w1HFpwaNu1Ljd1mXFXig22"
            ]
        },
        "update":
        {
            "Add": []
        }
    }
]
Before you execute the updateOperator function, check
the state of the smart contract with the operatorOf function.
You are ready now to update the operator on your SENDER_ACCOUNT address with the following command.
$ concordium-client contract update WCCD_CONTRACT_INDEX --entrypoint updateOperator --parameter-json updateOperator.json --sender SENDER_ACCOUNT --energy 25000 --grpc-port 20001
The below screenshot shows the execution of the updateOperator function.

Confirm that the updateOperator function has added/removed operator addresses by checking
with the operatorOf function the state of the smart contract again.
To continue with the tutorial click here.

